Presented for the first time at 2018
Translated into Korean
VHPC Lab 은 글쓴이가 재학했던 학교의 IT 연구실입니다.
.
.
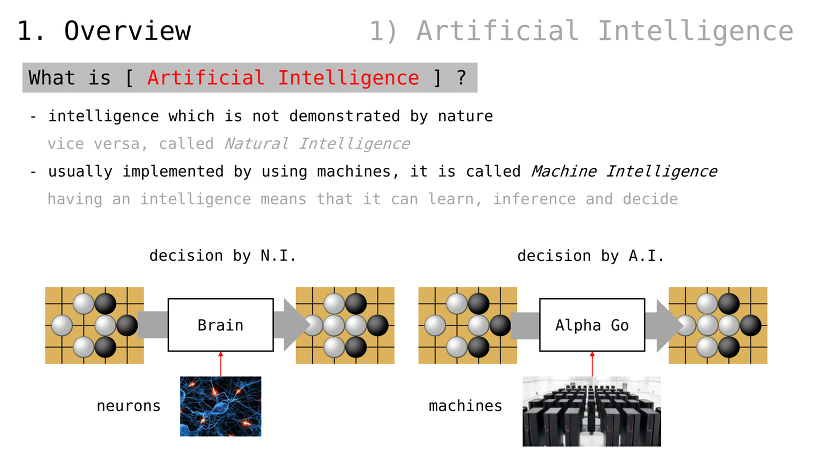
인공지능이란 무엇인가
자연적으로 정의되지 않은 지능
반대의 경우, 자연지능
인공지능은 주로 기계를 통해 구현되기 때문에, 기계지능이라고도 불림
지능을 가진다는 것은, 스스로 학습하고 추론하여 결정함을 의미

초기 인공지능
임의 알고리듬을 사용함
코드가 인공지능의 동작을 정의
하드웨어의 성격을 지님
동작을 수정하는 것이 (비교적) 어려움
제작자에 따라 인공지능 성능이 엇갈림
1980년대의 전문가 시스템이 대표적인 예시

머신러닝이란
인공지능 구현 방법론 중 하나
concept: 데이터가 인공지능의 동작을 정의
소프트웨어의 성격을 지님
동작을 수정하는 것이 (비교적) 쉬움
입력된 데이터와 학습전략에 따라 인공지능 성능이 엇갈림
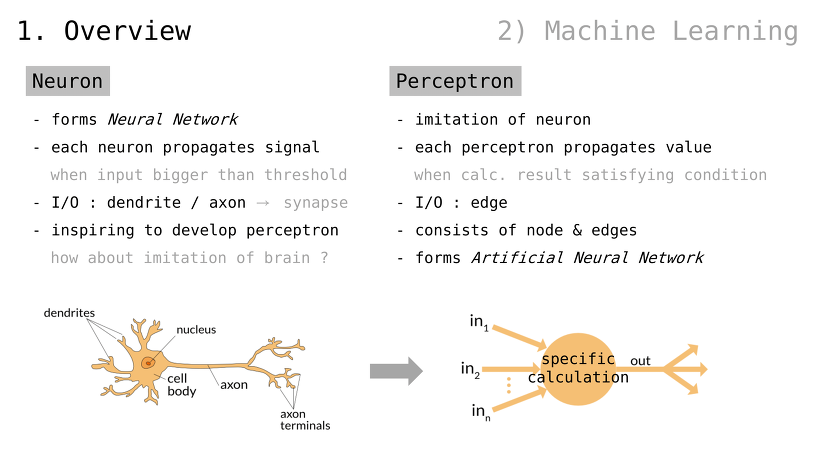
뉴런
신경망을 구성
각 뉴런은 신호를 전파함
입력값이 threshold 보다 커질 경우
입출력 : 수상돌기 / 축색돌기 (즉, 신경접합부 ㅡsynapseㅡ)
“뇌를 모방해보면 어떨까”에 대한 영감 ㅡinspiringㅡ
퍼셉트론
뉴런을 모방함
각 퍼셉트론은 값을 전파함
조건을 만족할 때 계산을 수행함
입출력 : 단말
노드와 단말로 구성됨

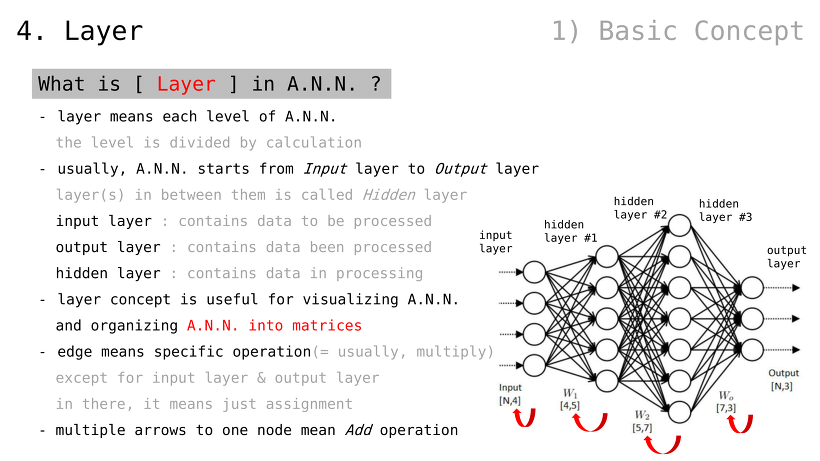
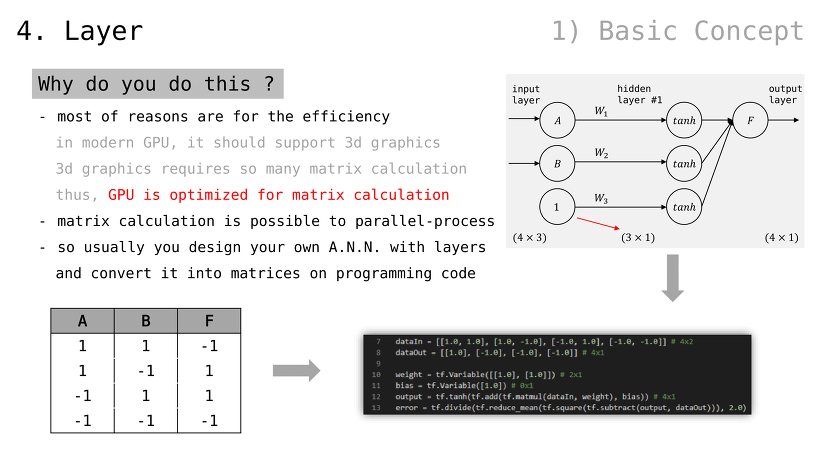
인공 신경망이란
자연 신경망을 모방한 망 ㅡnetworkㅡ
다양한 계산들이 내포됨
대부분은 더하기와 곱하기
출력값을 수정하기 용이한 설계
가중치 변수만 조절하면 됨
이러한 구조가 학습 비용을 절감함
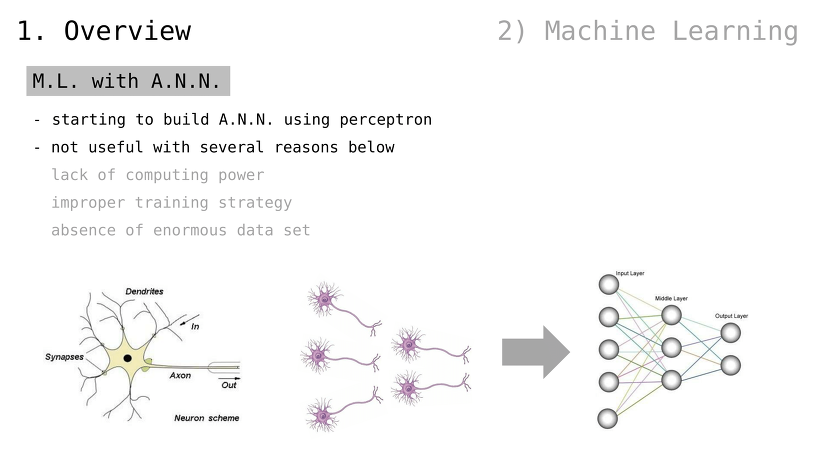
인공 신경망을 활용한 머신러닝
단일 퍼셉트론을 사용한 인공 신경망부터 시작되었음
여러 가지 이유로 효과적이지 않았음
부족한 컴퓨팅 파워
비효율적인 학습 전략
대규모 데이터셋의 부재
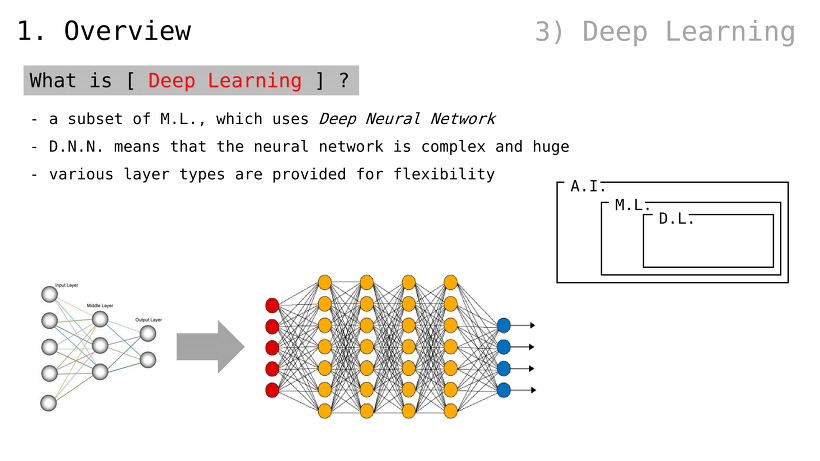
딥러닝이란
머신러닝의 일종으로서, Deep Neural Network (이하, D.N.N.) 를 사용함
(인공) 신경망이 매우 복잡하고 거대할 경우, 이를 D.N.N. 이라 부름
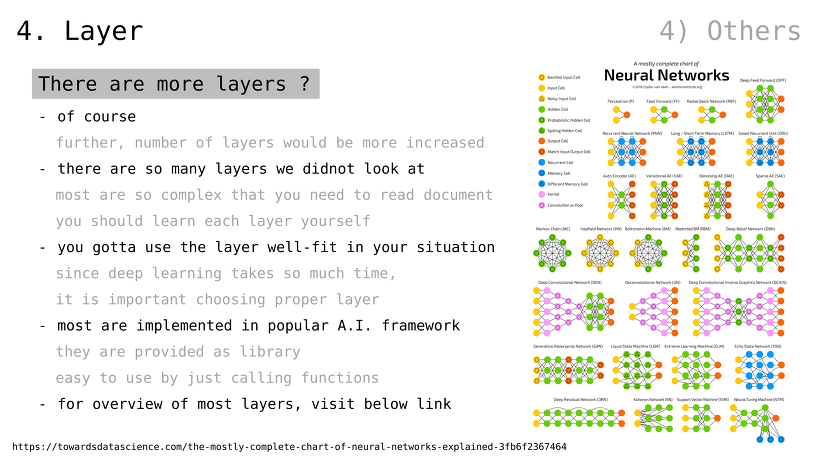
다양한 레이어 유형들이 제공되어 유연함
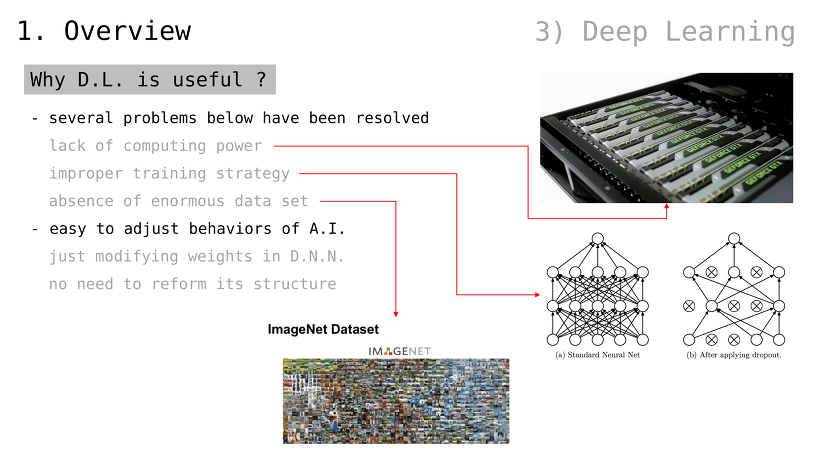
왜 딥러닝이 유용한가
여러 가지 문제점들이 해결됨
부족한 컴퓨팅 파워
비효율적인 학습 전략
대규모 데이터셋의 부재
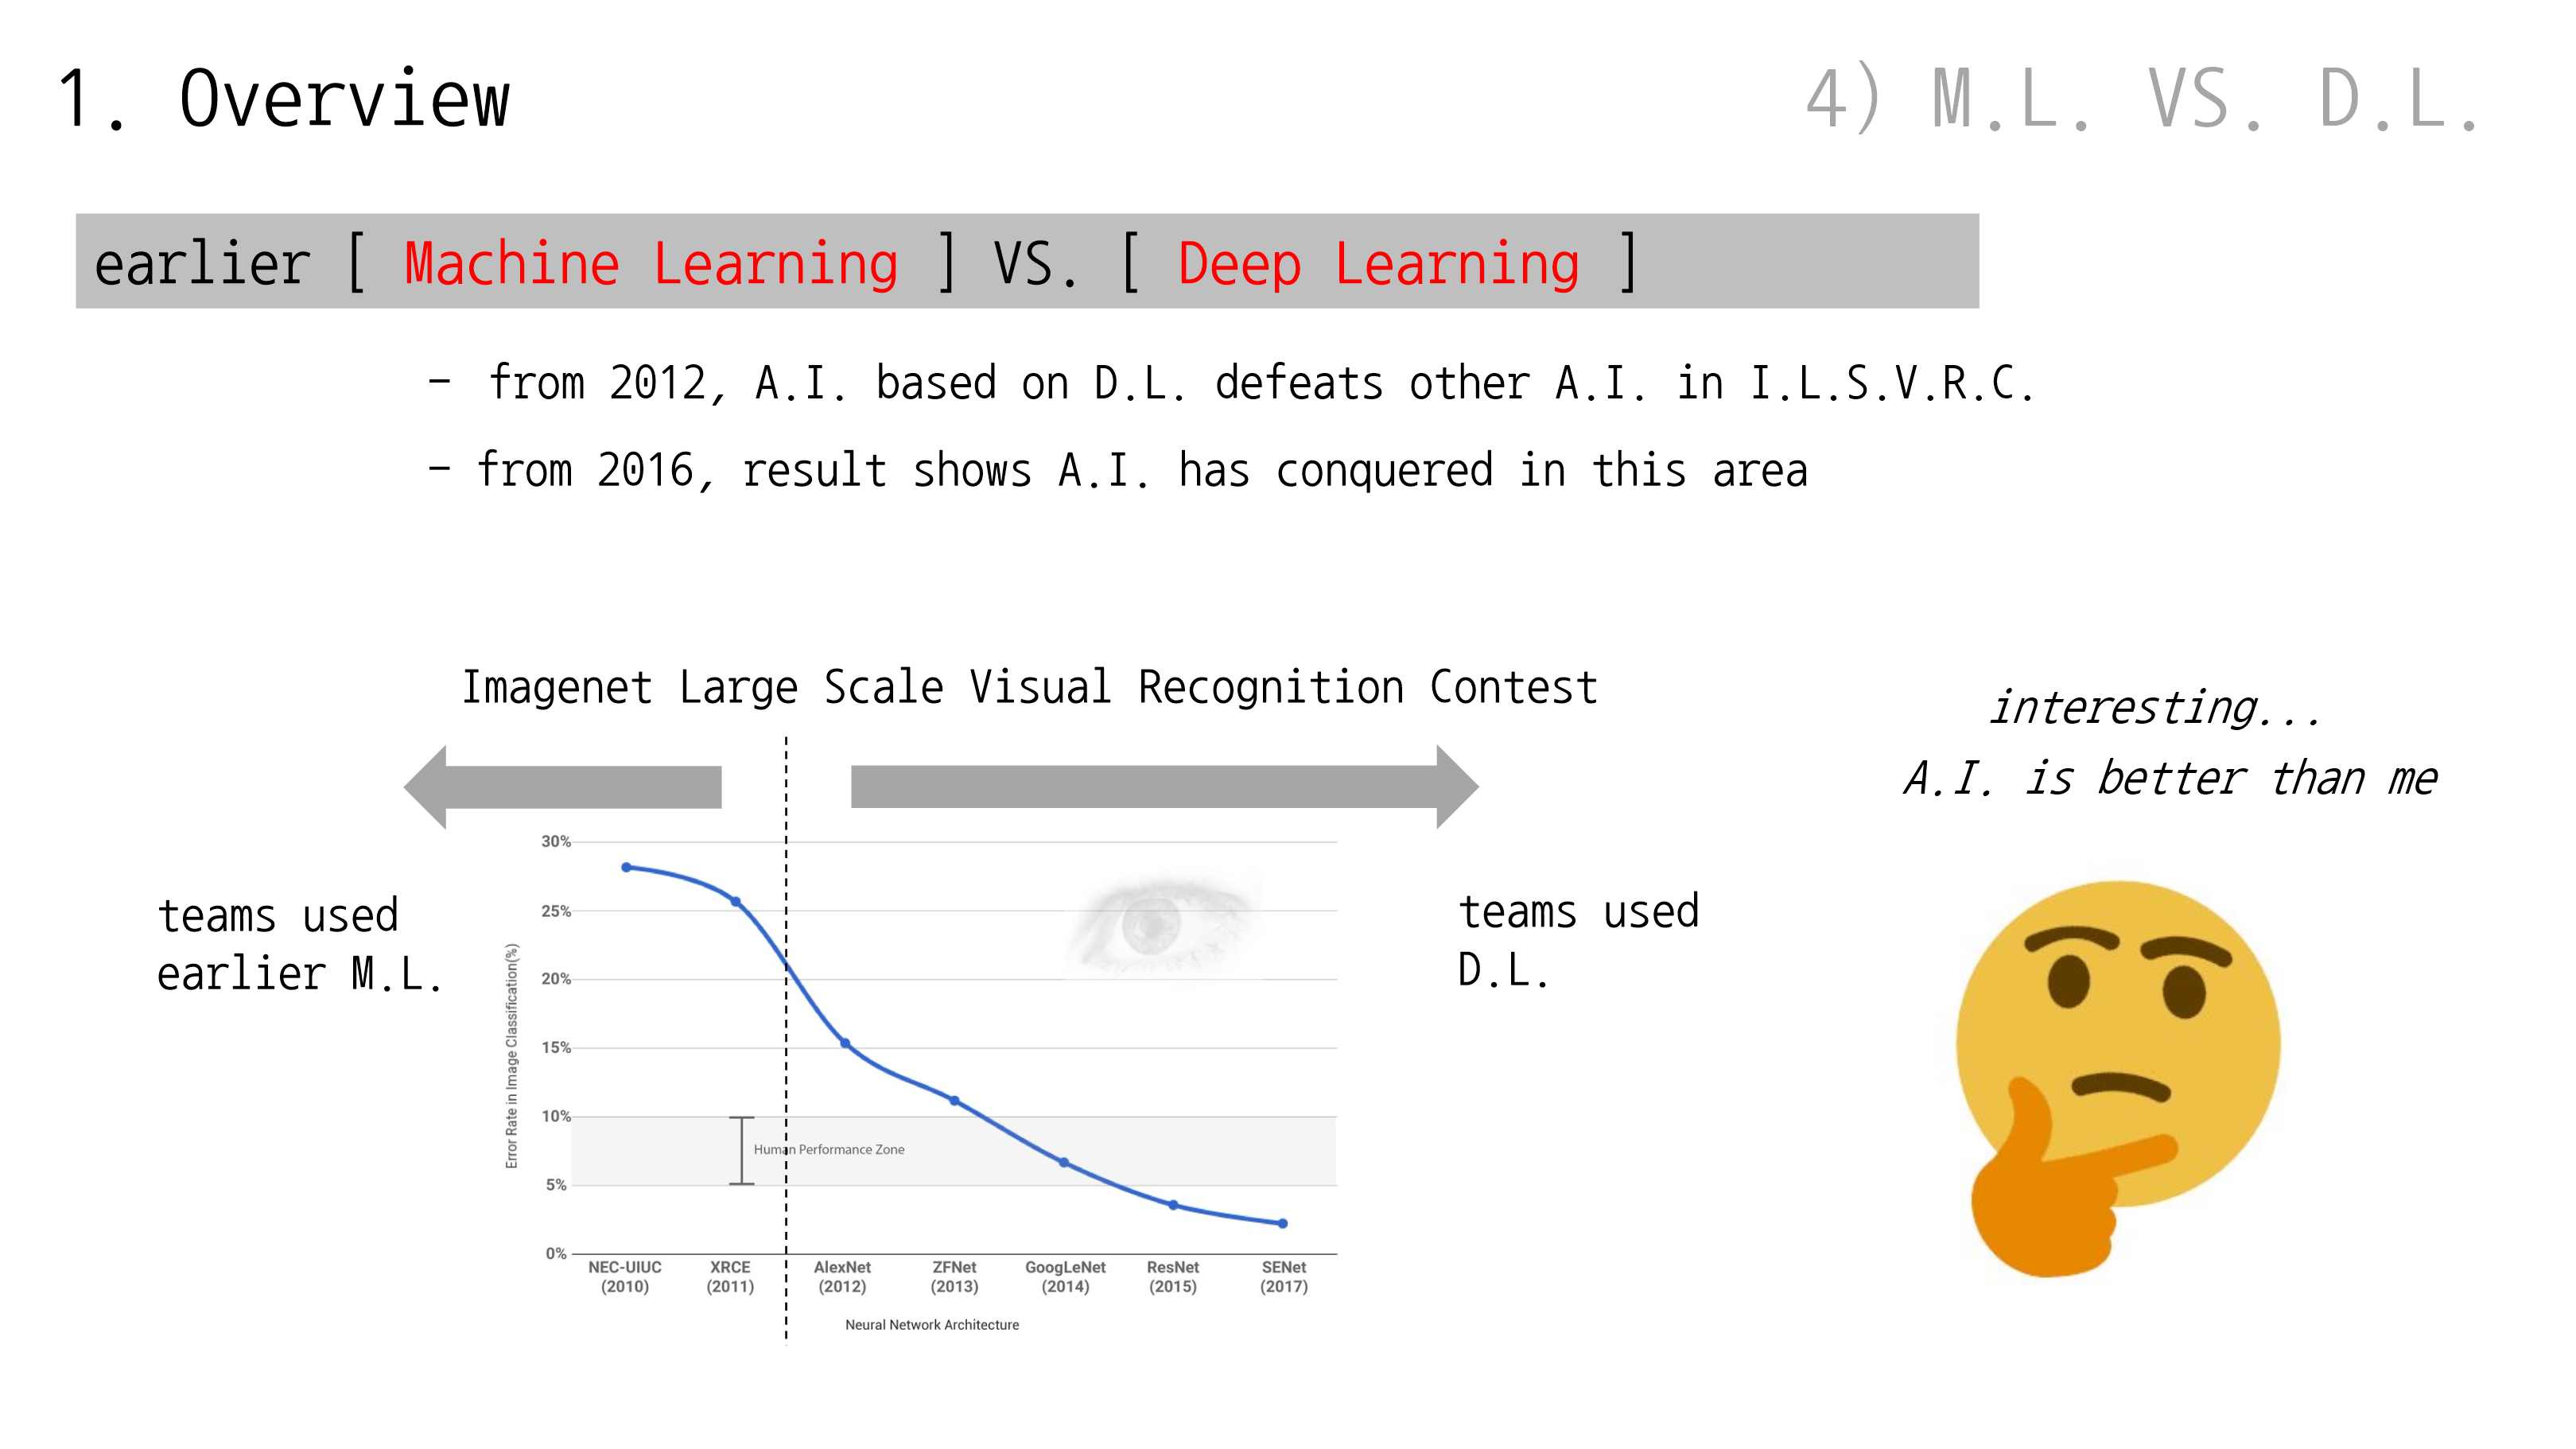
초기 머신러닝과 딥러닝의 비교
2012년부터, 딥러닝 기반 인공지능이 I.L.S.V.R.C. 기반 인공지능을 이김
2016년부터, 해당 영역은 (딥러닝 기반) 인공지능이 장악해버린 것을 알 수 있음
더 자세히
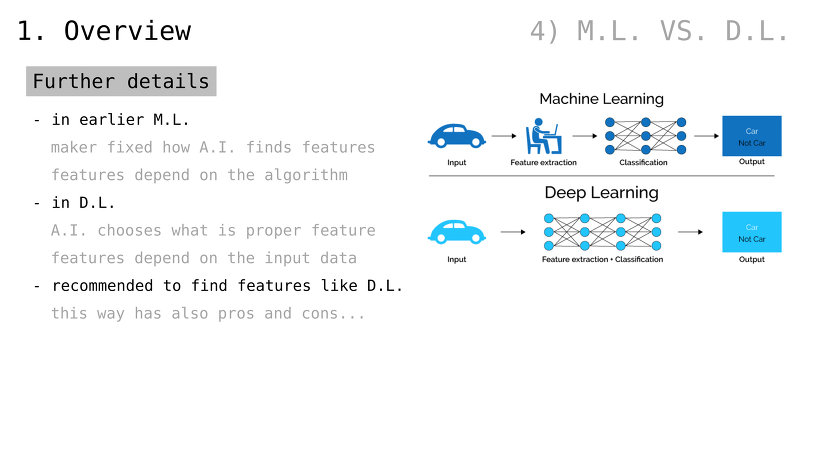
초기 머신러닝
어떻게 결과를 도출할지 제작자가 결정
(예컨대, 자동차를 인식하기 위해 둥근 선이 바퀴의 특징이고 각진 선이 차체의 특징이라고 정의)
딥러닝
어떻게 결과를 도출할지조차 인공지능이 결정
(예컨대, 자동차를 인식하기 위한 특징이 무엇인지 알려주지 않음)
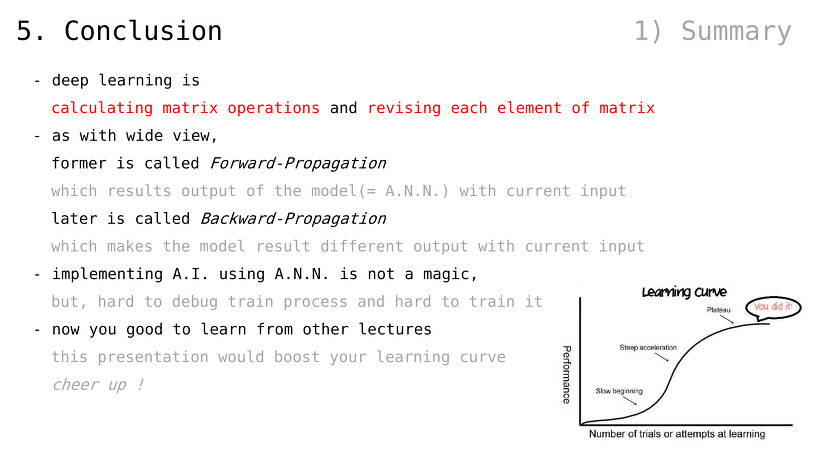
딥러닝 같은 방식이 (요즘 들어) 추천됨
물론 장단점은 있음
(생략)
.

Gradient Method 란
선형시스템을 수치계산으로 풀어내는 방법론
그 중에서도, Gradient Descent 를 다룰 것 (인공신경망의 가중치값을 조정하는 데에 사용되는 알고리듬)
다음 상황을 가정
곱하기 연산에 두 가지 입력값이 제공됨
출력값을 0 에 가깝게 만들고 싶음
입력값만 수정할 수 있음
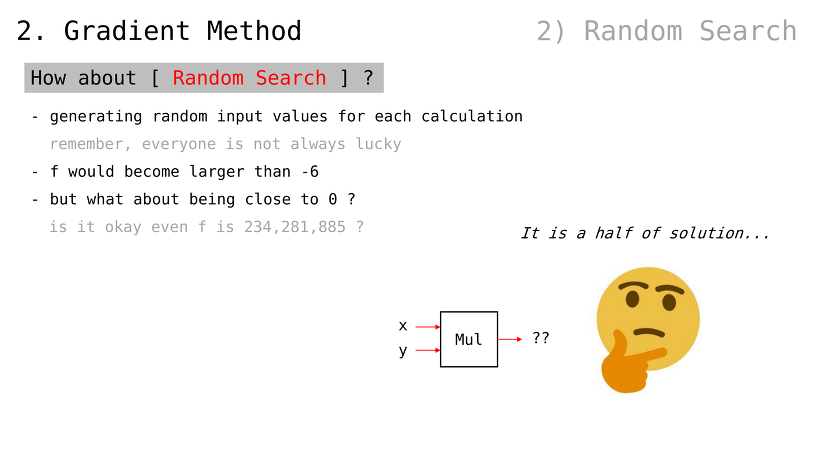
무작위 검색은 어떨까
계산할 때마다 무작위 값을 생성
하지만, 항상 운이 좋을 수는 없음
f (함수 출력값) 는 -6 보다 높아질 수도 있음
하지만 (높아진다 하더라도) 234,281,855 같은 큰 수여도 괜찮을까
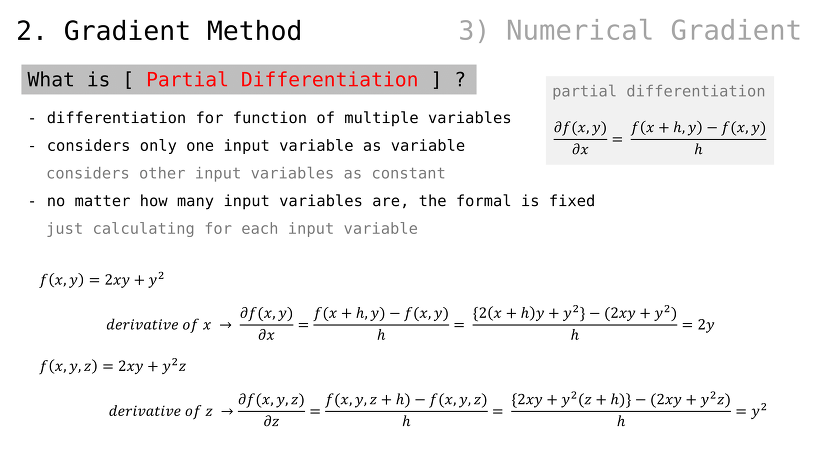
편미분이란
변수가 여러 개인 함수를 미분하는 방법
여러 개의 변수들 중 하나만을 다룸
나머지 변수들은 상수 취급
변수 개수에 상관 없이, 공식은 고정
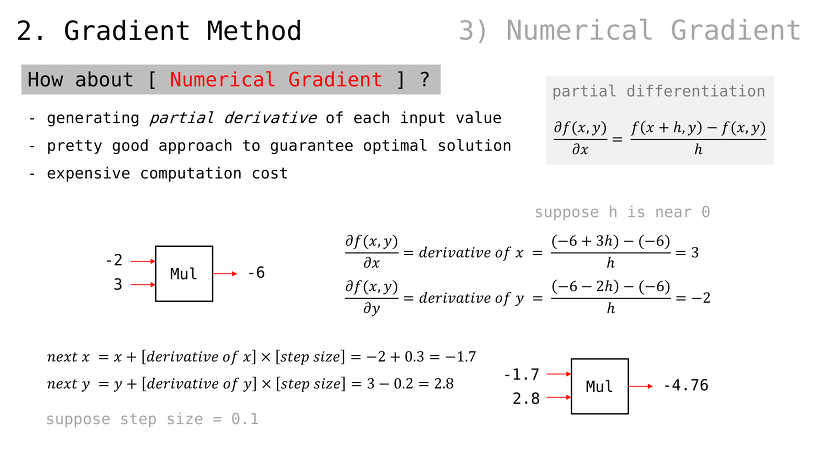
Numerical Gradient 란
각 입력값에 대해 편미분을 적용하는 방법
(편미분 값을 계속해서 더함)
최적해 찾는 꽤 좋은 방법
하지만 연산비용이 높음
(단, 정밀한 조작 위해 step size 라는 배수 적용)
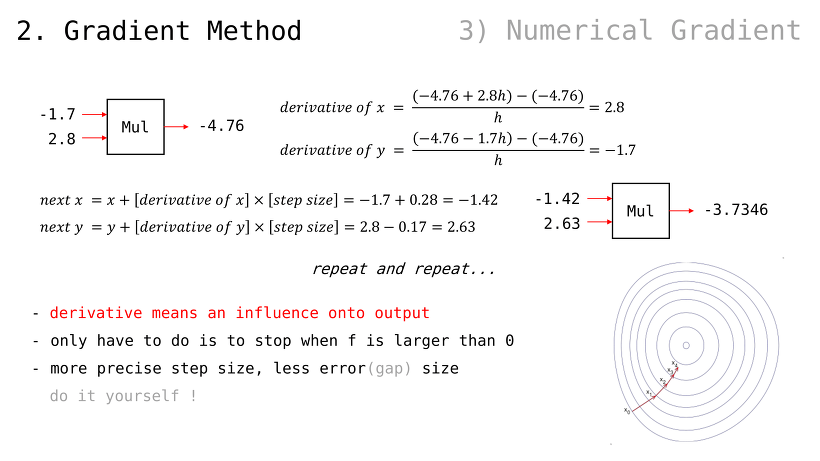
편미분 값은 출력값에 대한 (입력값이 가지는) 영향력을 의미
(우리가 해야할 것은) 단지 f 값이 0 을 넘어갈 때 멈추는 것
step size 값이 더 정밀하면 오류값도 적음
Analytic Gradient 란
Numerical Gradient 의 개선판
계산비용에서 보다 효율적임
미분값을 (매번 계산하지 않고) 고정된 값 사용
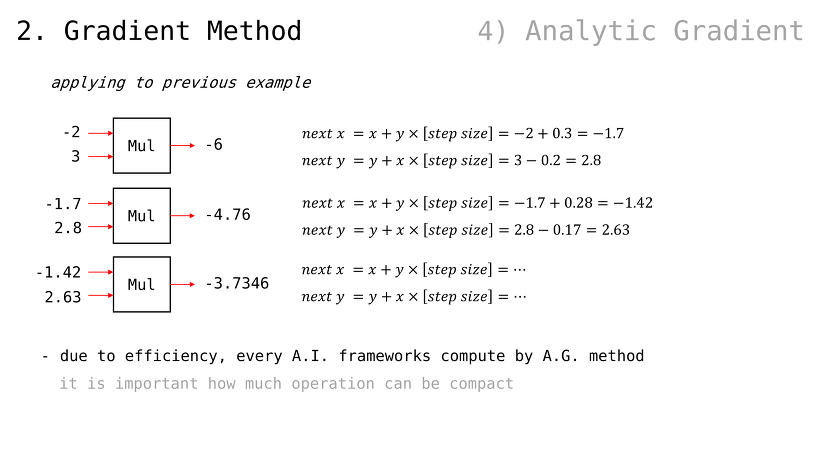
이전 예제에 적용해볼 경우
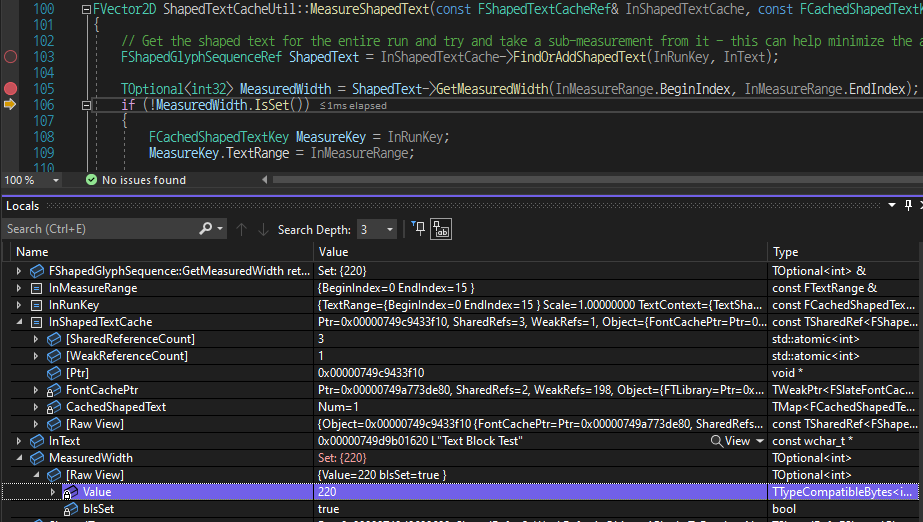
효율성 때문에, 모든 인공지능 프레임워크에서는 이러한 방법을 사용
아무리 더하기 빼기 곱하기 같은 간단한 계산뿐이라고 해도, 총량에서 수 배 십 수 배 차이가 날 수 있기 때문
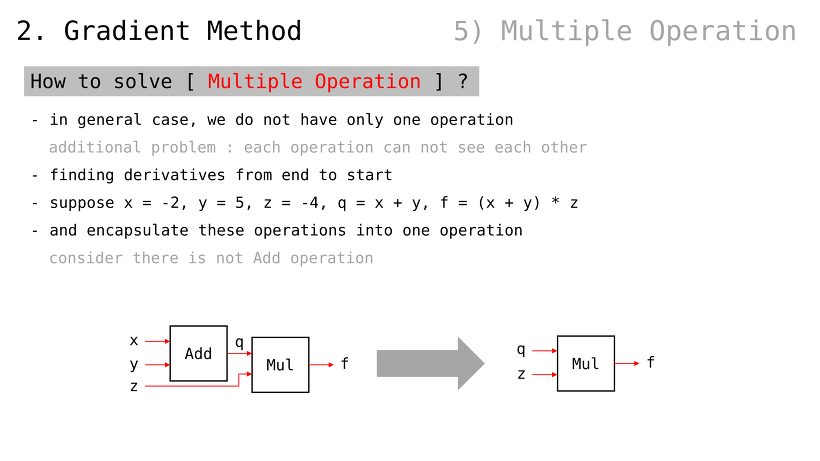
다중연산을 어떻게 푸는가
일반적인 경우, 한 가지 연산만 사용하지 않음
그런데, 다중연산일 경우에는 각 연산들이 서로의 정보를 알 수 없음
(그럼에도 불구하고, 편미분값을 알아야 학습을 할 수 있을 텐데 이를 어떻게 하는가가 관건)
입력값으로
연산으로 를 가정
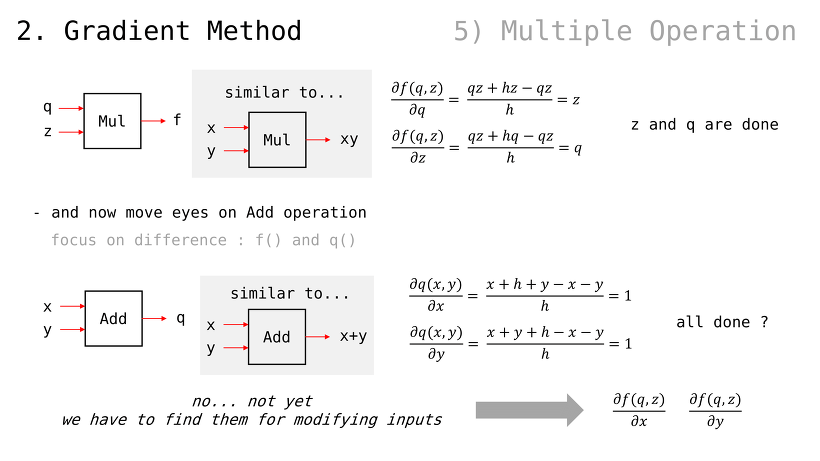
(앞서 살펴봤던 내용과 마찬가지로) q 에 대한 편미분값은 z 이고, z 에 대한 편미분값은 q
x 에 대한 편미분값은 1 이고, y 에 대한 편미분값은 1
이렇게만 결론지으면 되는 걸까
아니다. 우리가 구한 것은 각 연산에서의 국소적 편미분값들이고, 우리가 원하는 것은 f 값에 대한 x y z 변수들의 편미분값이다
(당연하게도, 우리가 조절할 수 있는 값은 x y z 세 가지 변수뿐이기 때문)
즉, 추가로 를 찾아야한다
(방금 는 찾았음)
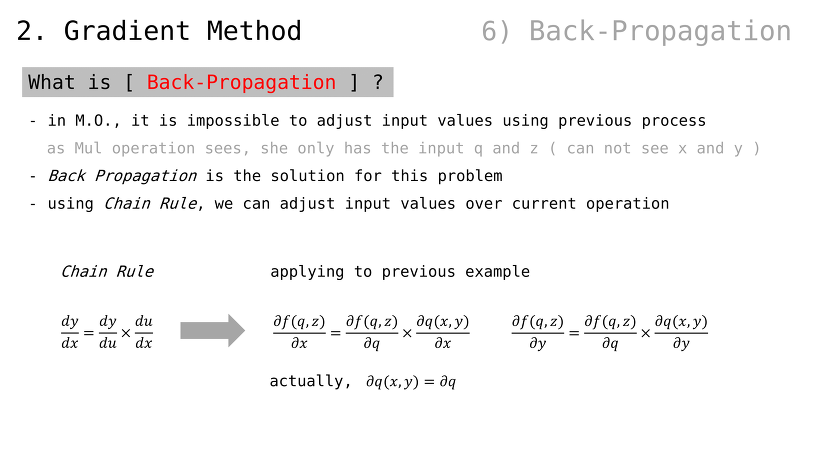
역전파 ㅡBack Propagationㅡ 란
확인했다시피, 다중연산에서 입력값의 편미분값을 구하는 게 불가능해 보였음
예컨대, f 연산은 x 와 y 에 대해 알 수 있는 방법이 없음
역전파는 이러한 문제를 해결 가능
연쇄규칙 ㅡChain Ruleㅡ 을 사용하면, 연산 너머의 입력값들에 대한 편미분값을 획득 가능
(다시 한 번 예제 규칙을 정리하면 다음과 같음)
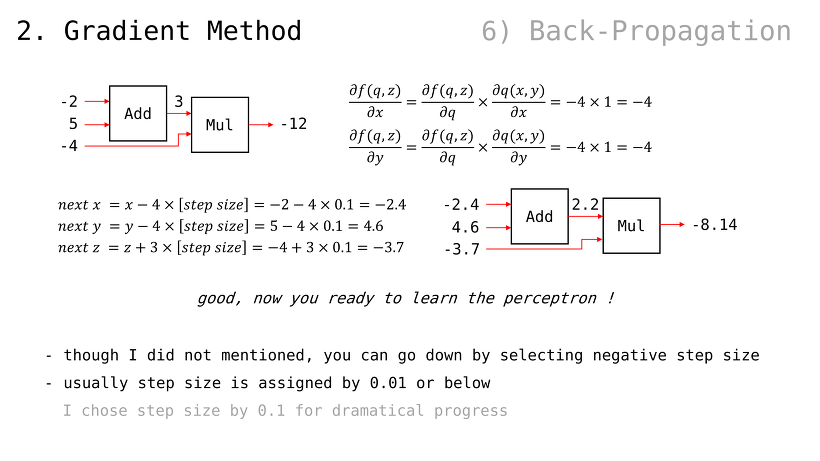
최종 f 값을 바꾸기 위한, x y z 미분값들을 모두 구할 수 있음
(최종 f 값이, 0 에 가까워져 가는 것 확인 가능)
당연하게도, 원한다면 step size 값을 음수 사용하는 것도 고려해볼 수 있음
주로, step size 는 0.01 같은 매우 작은 값이 사용됨
예시에서는, 극적인 변화 위해 0.1 로 사용하였음
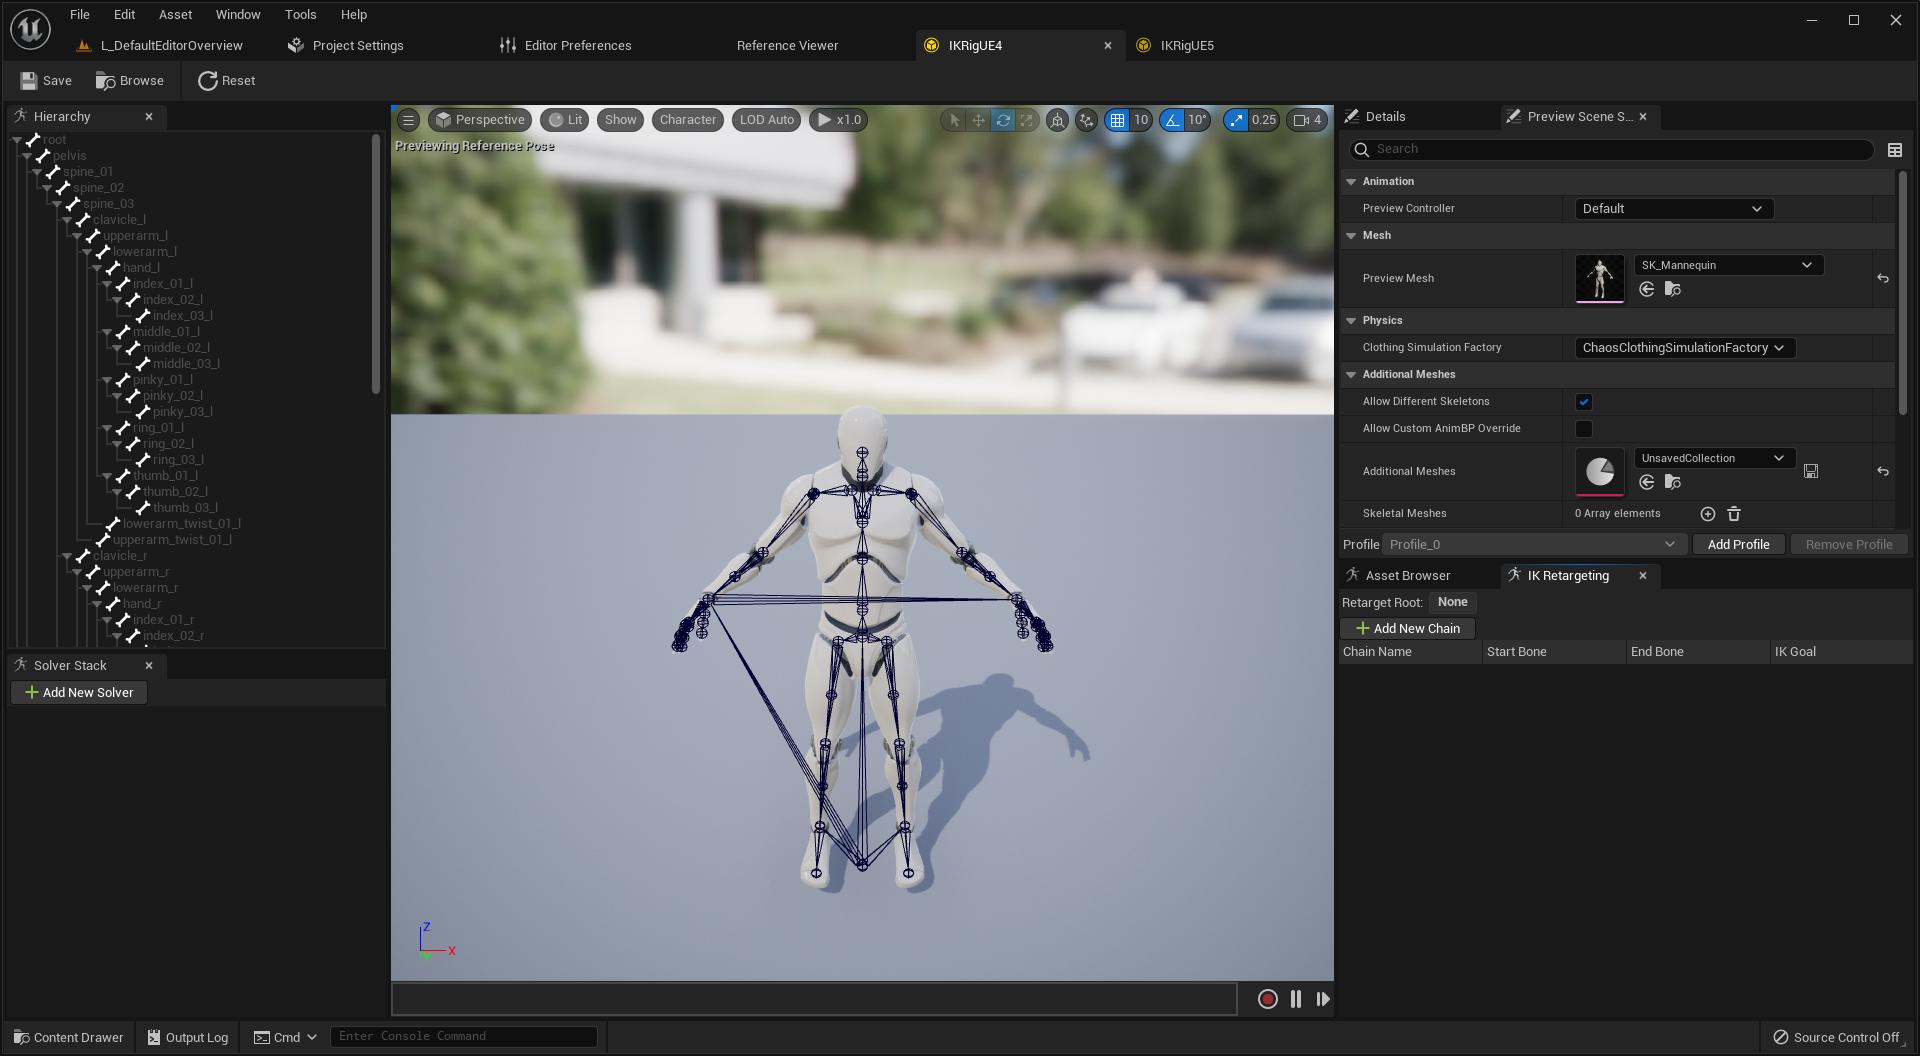
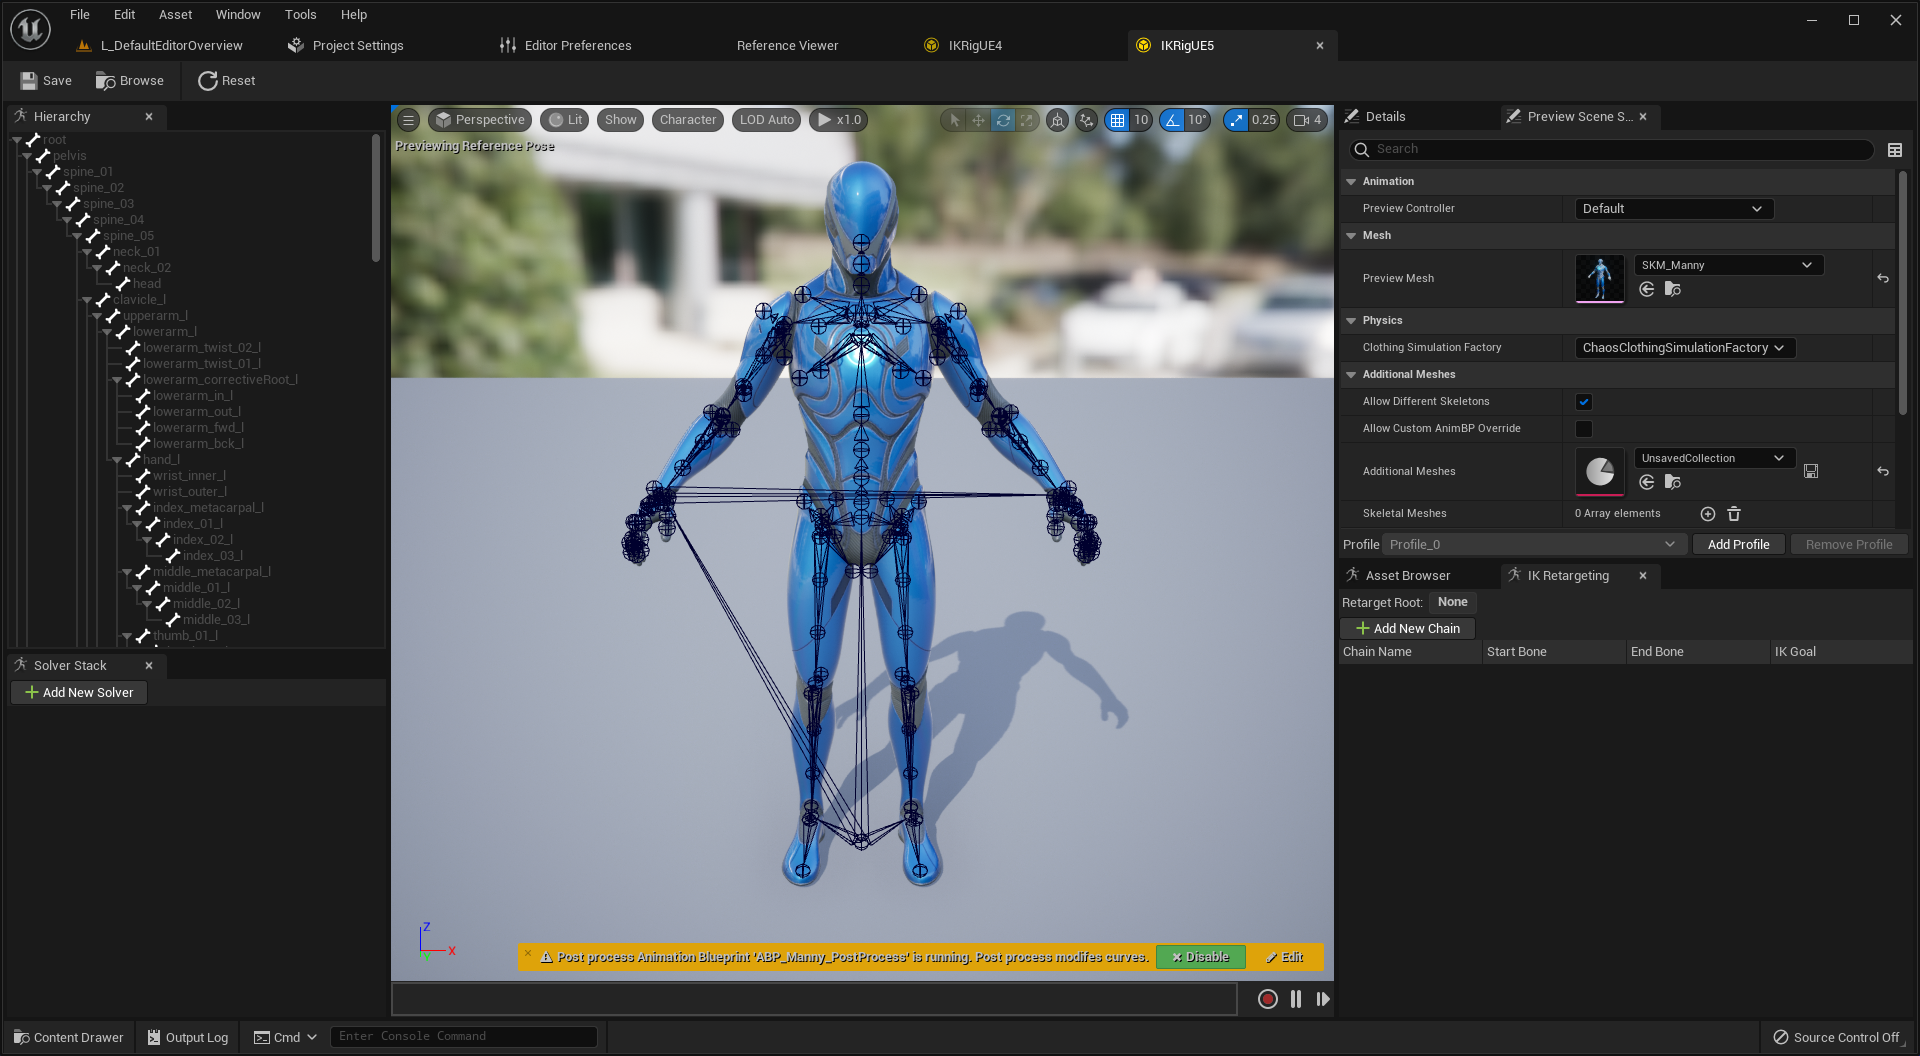
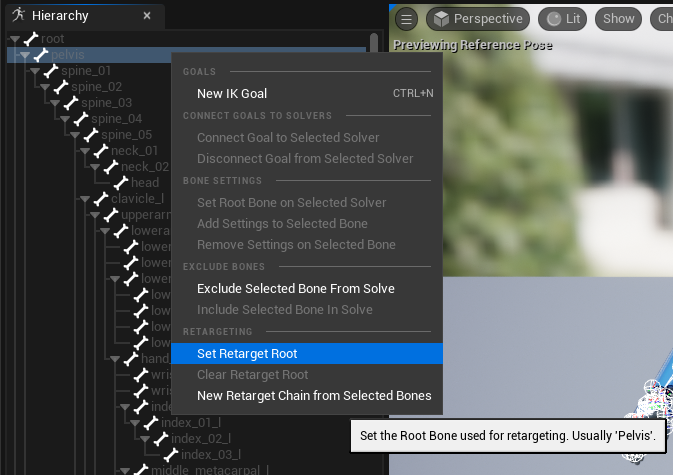
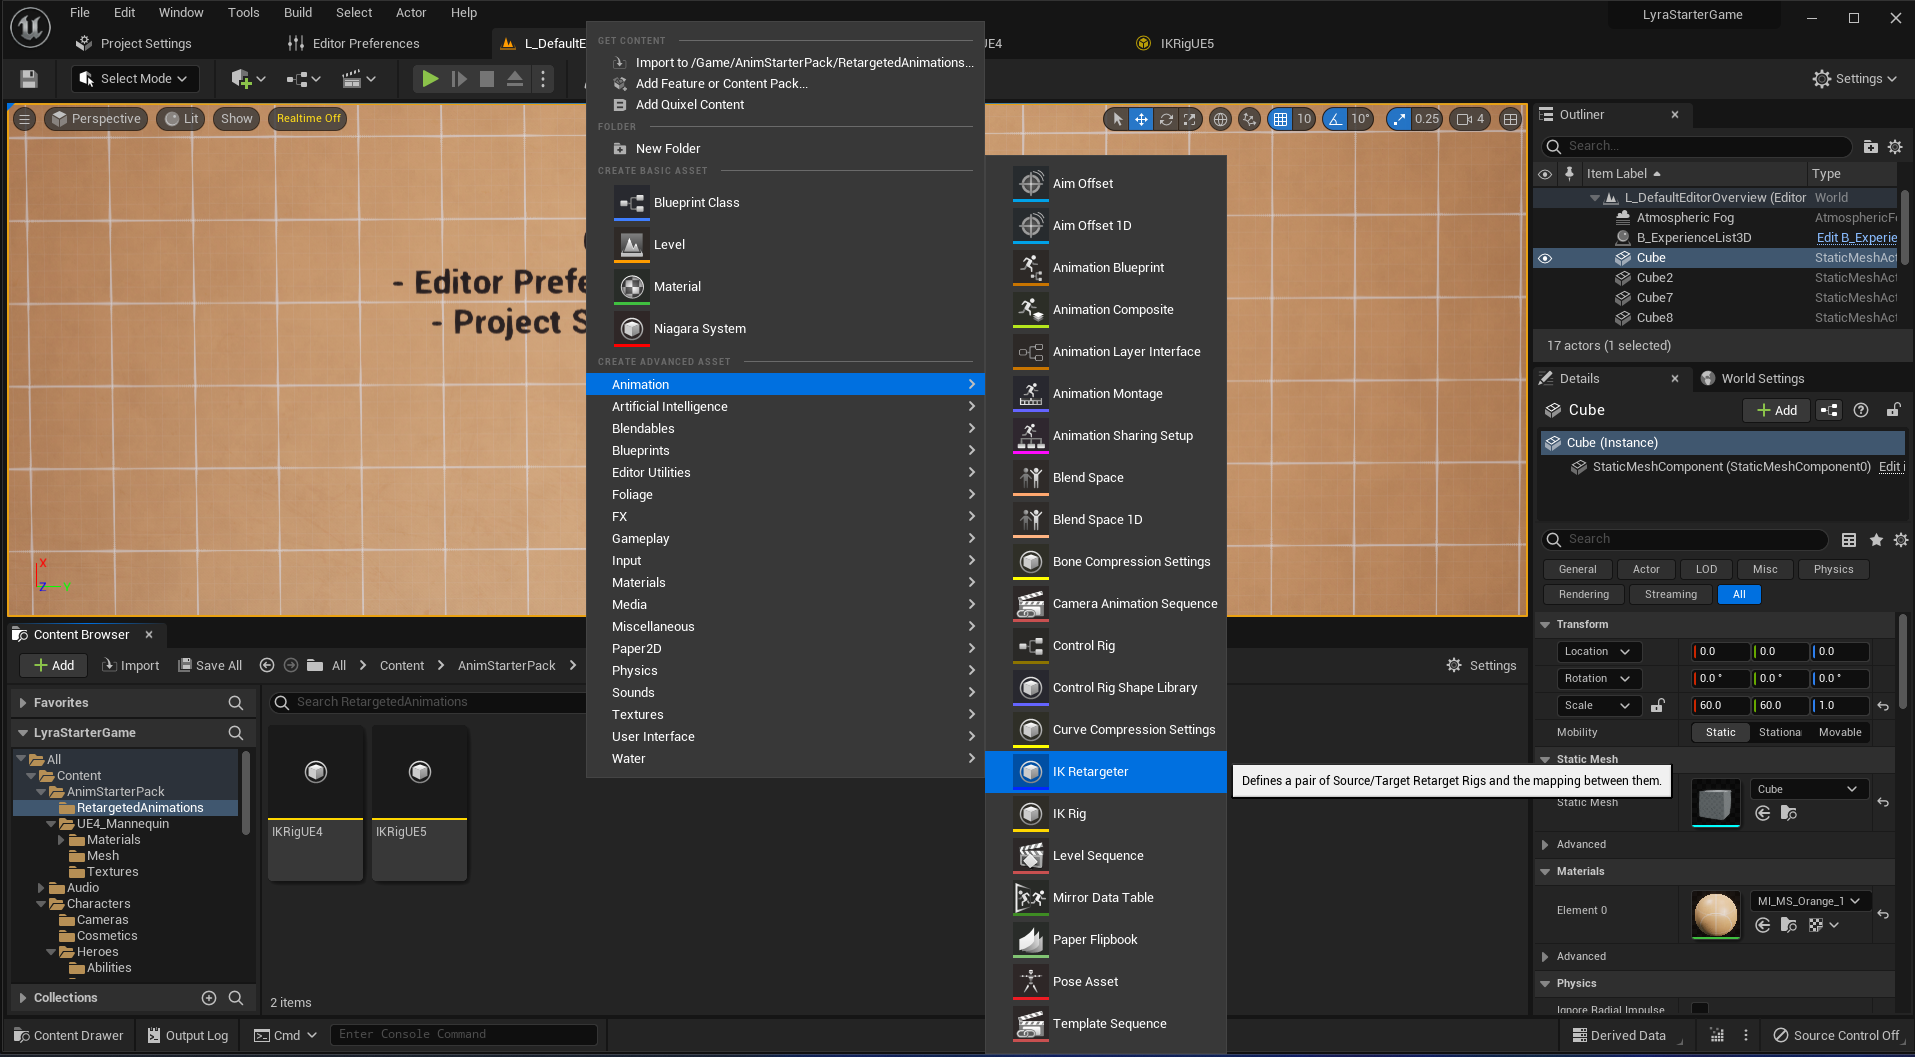
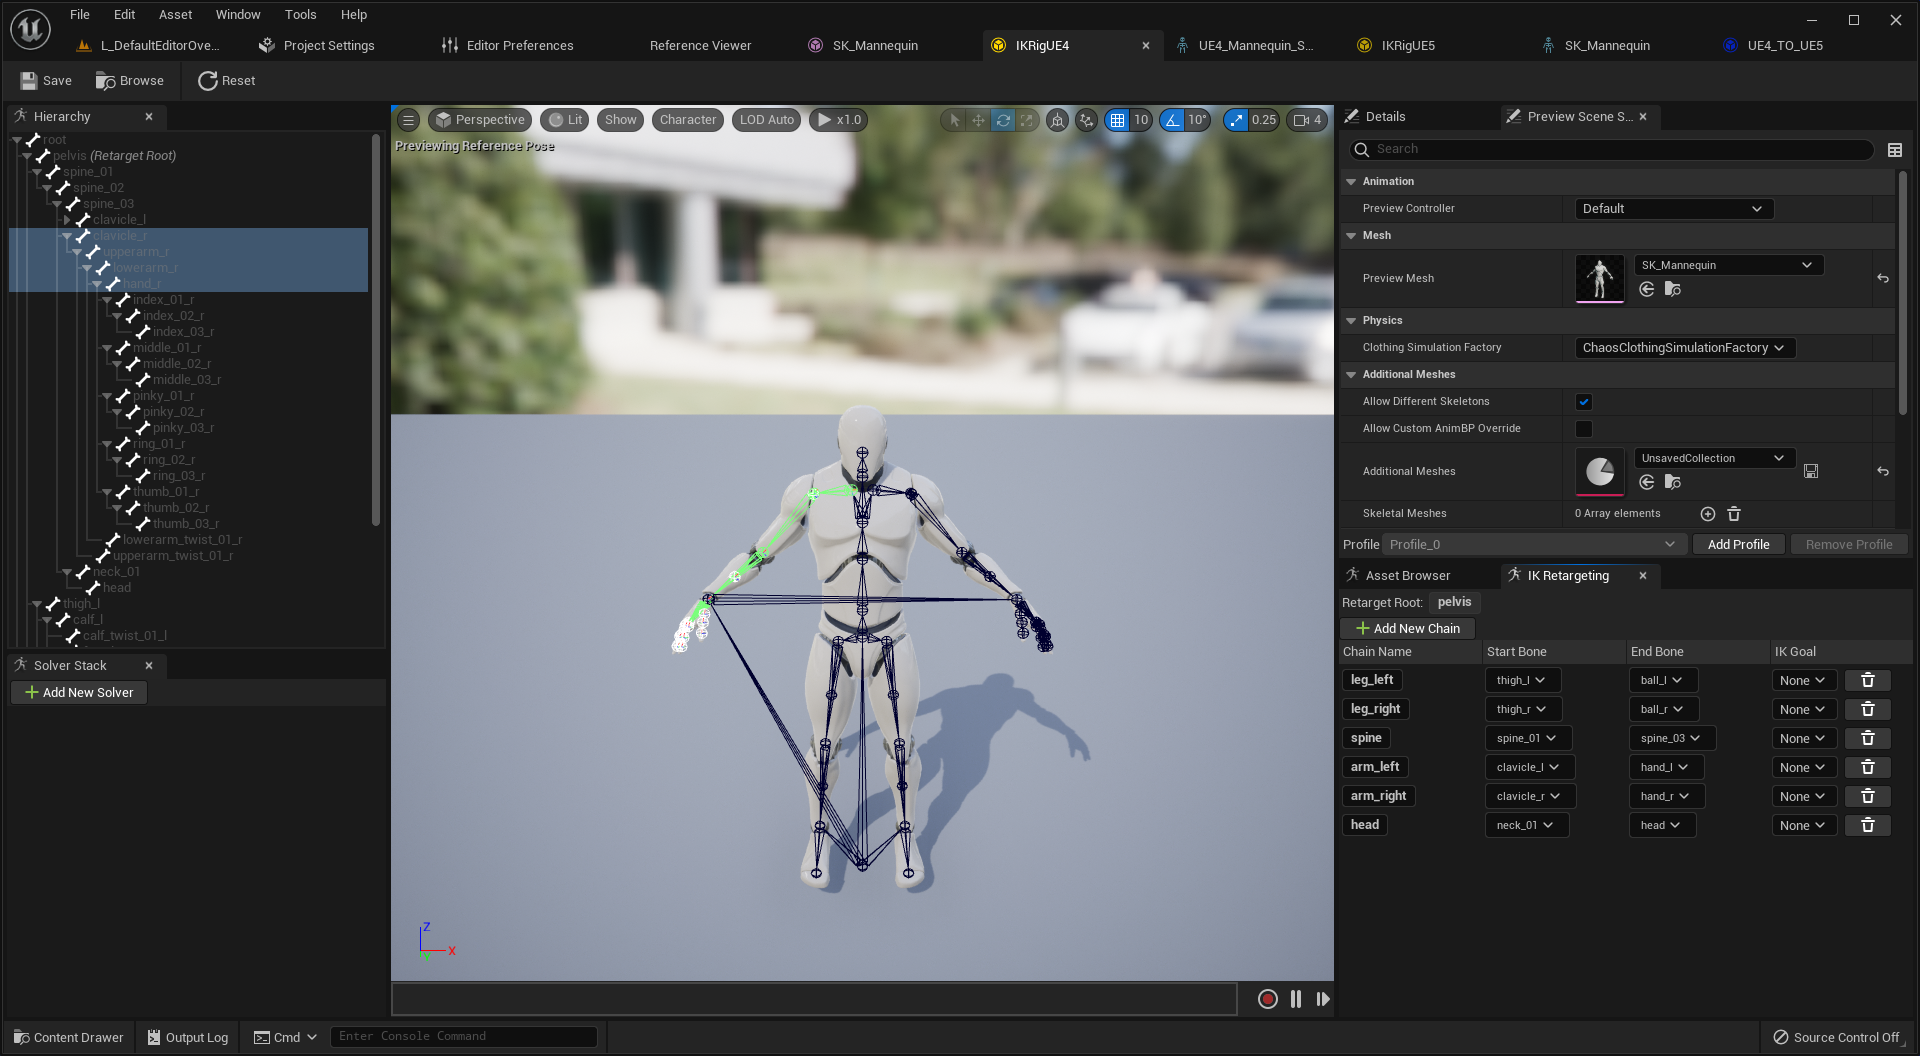
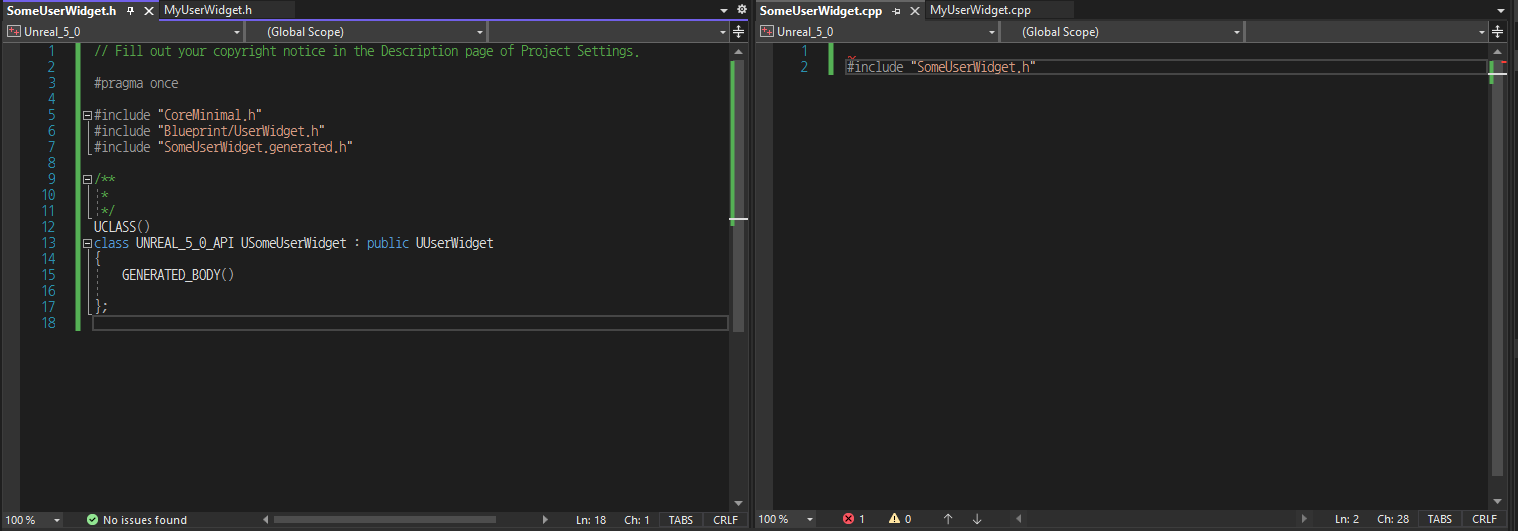
이제 퍼셉트론 배우기 위한 배경지식은 준비되었음 (3장 내용)
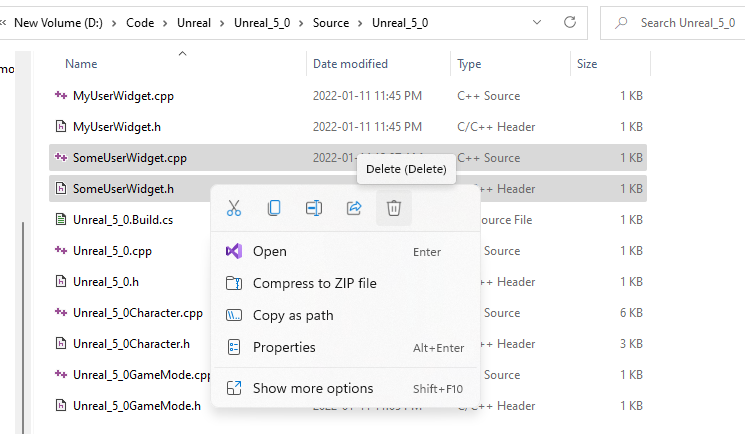
2장의 내용은 소스코드로도 확인 및 직접 실행해볼 수 있음
https://github.com/BaeMinCheon/introduction-to-ai/tree/master/Chapter02

.
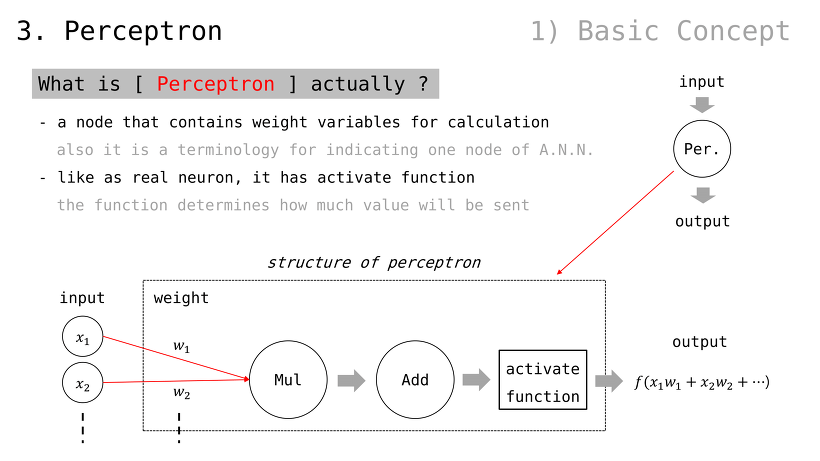
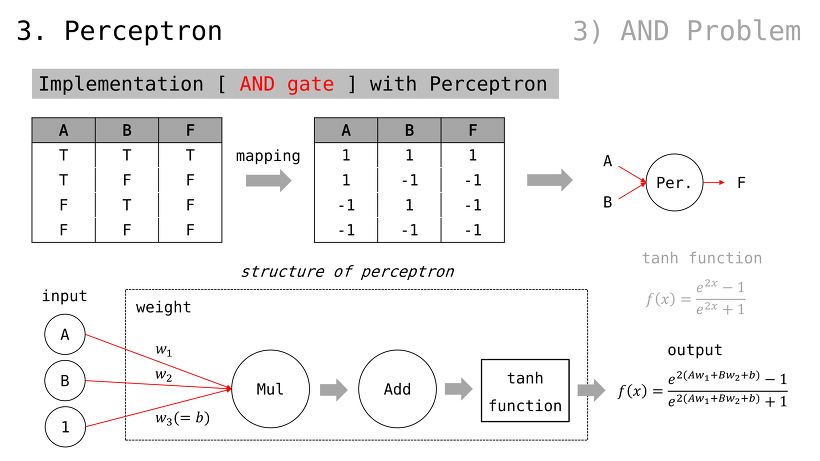
퍼셉트론이란
계산에 필요한 가중치 변수들을 보유하는 노드
인공신경망에서의 노드 하나하나를 지칭하는 용어이기도 함
뉴런처럼, 활성화함수를 가짐
활성화함수는 (자신에게 연결된 다른 퍼셉트론에게) 어떻게 값이 전달될 지 결정하는 역할 수행
(곱하기, 더하기, 활성화함수 순서는 예시일 뿐. 경우에 따라 다른 구조를 가질 수 있음)
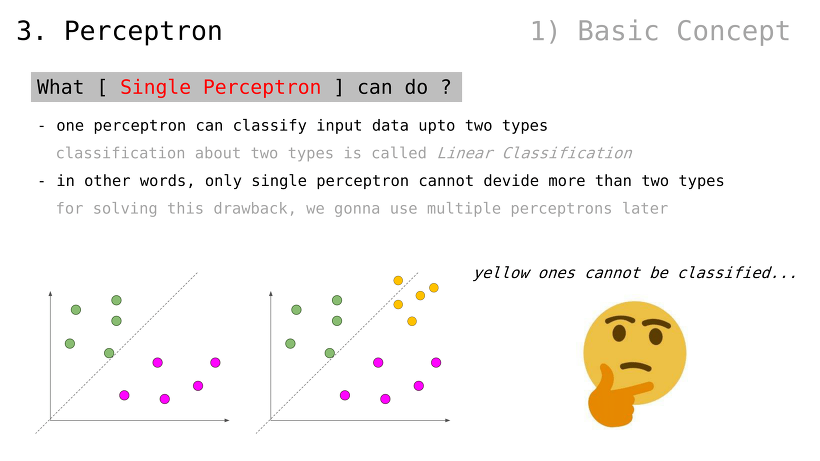
단일 퍼셉트론이 할 수 있는 것
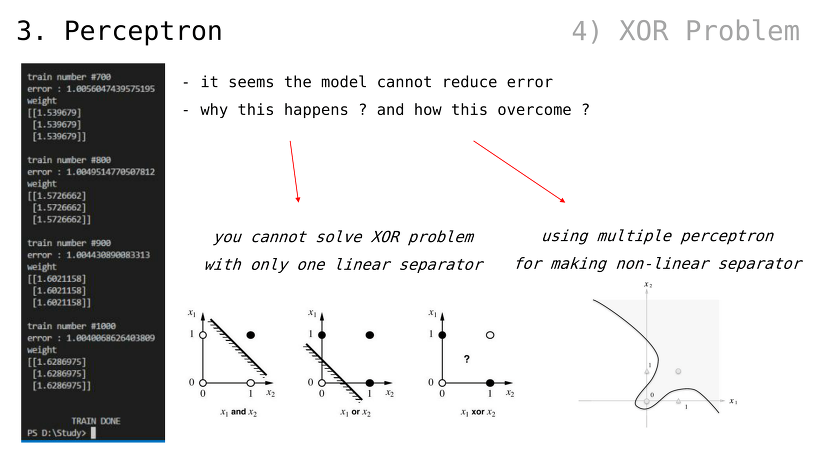
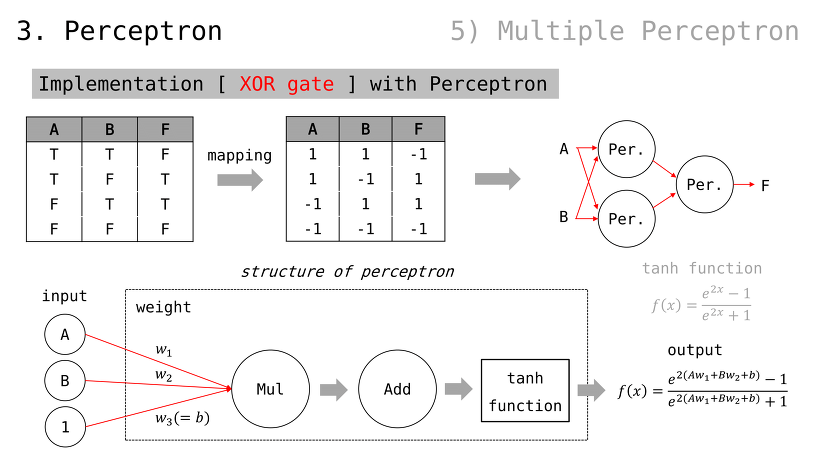
단일 퍼셉트론은 최대 2가지 종류의 데이터를 분류 가능
1가지 종류 데이터 분류일 경우, Linear Regression (다음 슬라이드에서 다룰 것)
2가지 종류 데이터 분류일 경우, Binary Classification (또는, Linear Classification)
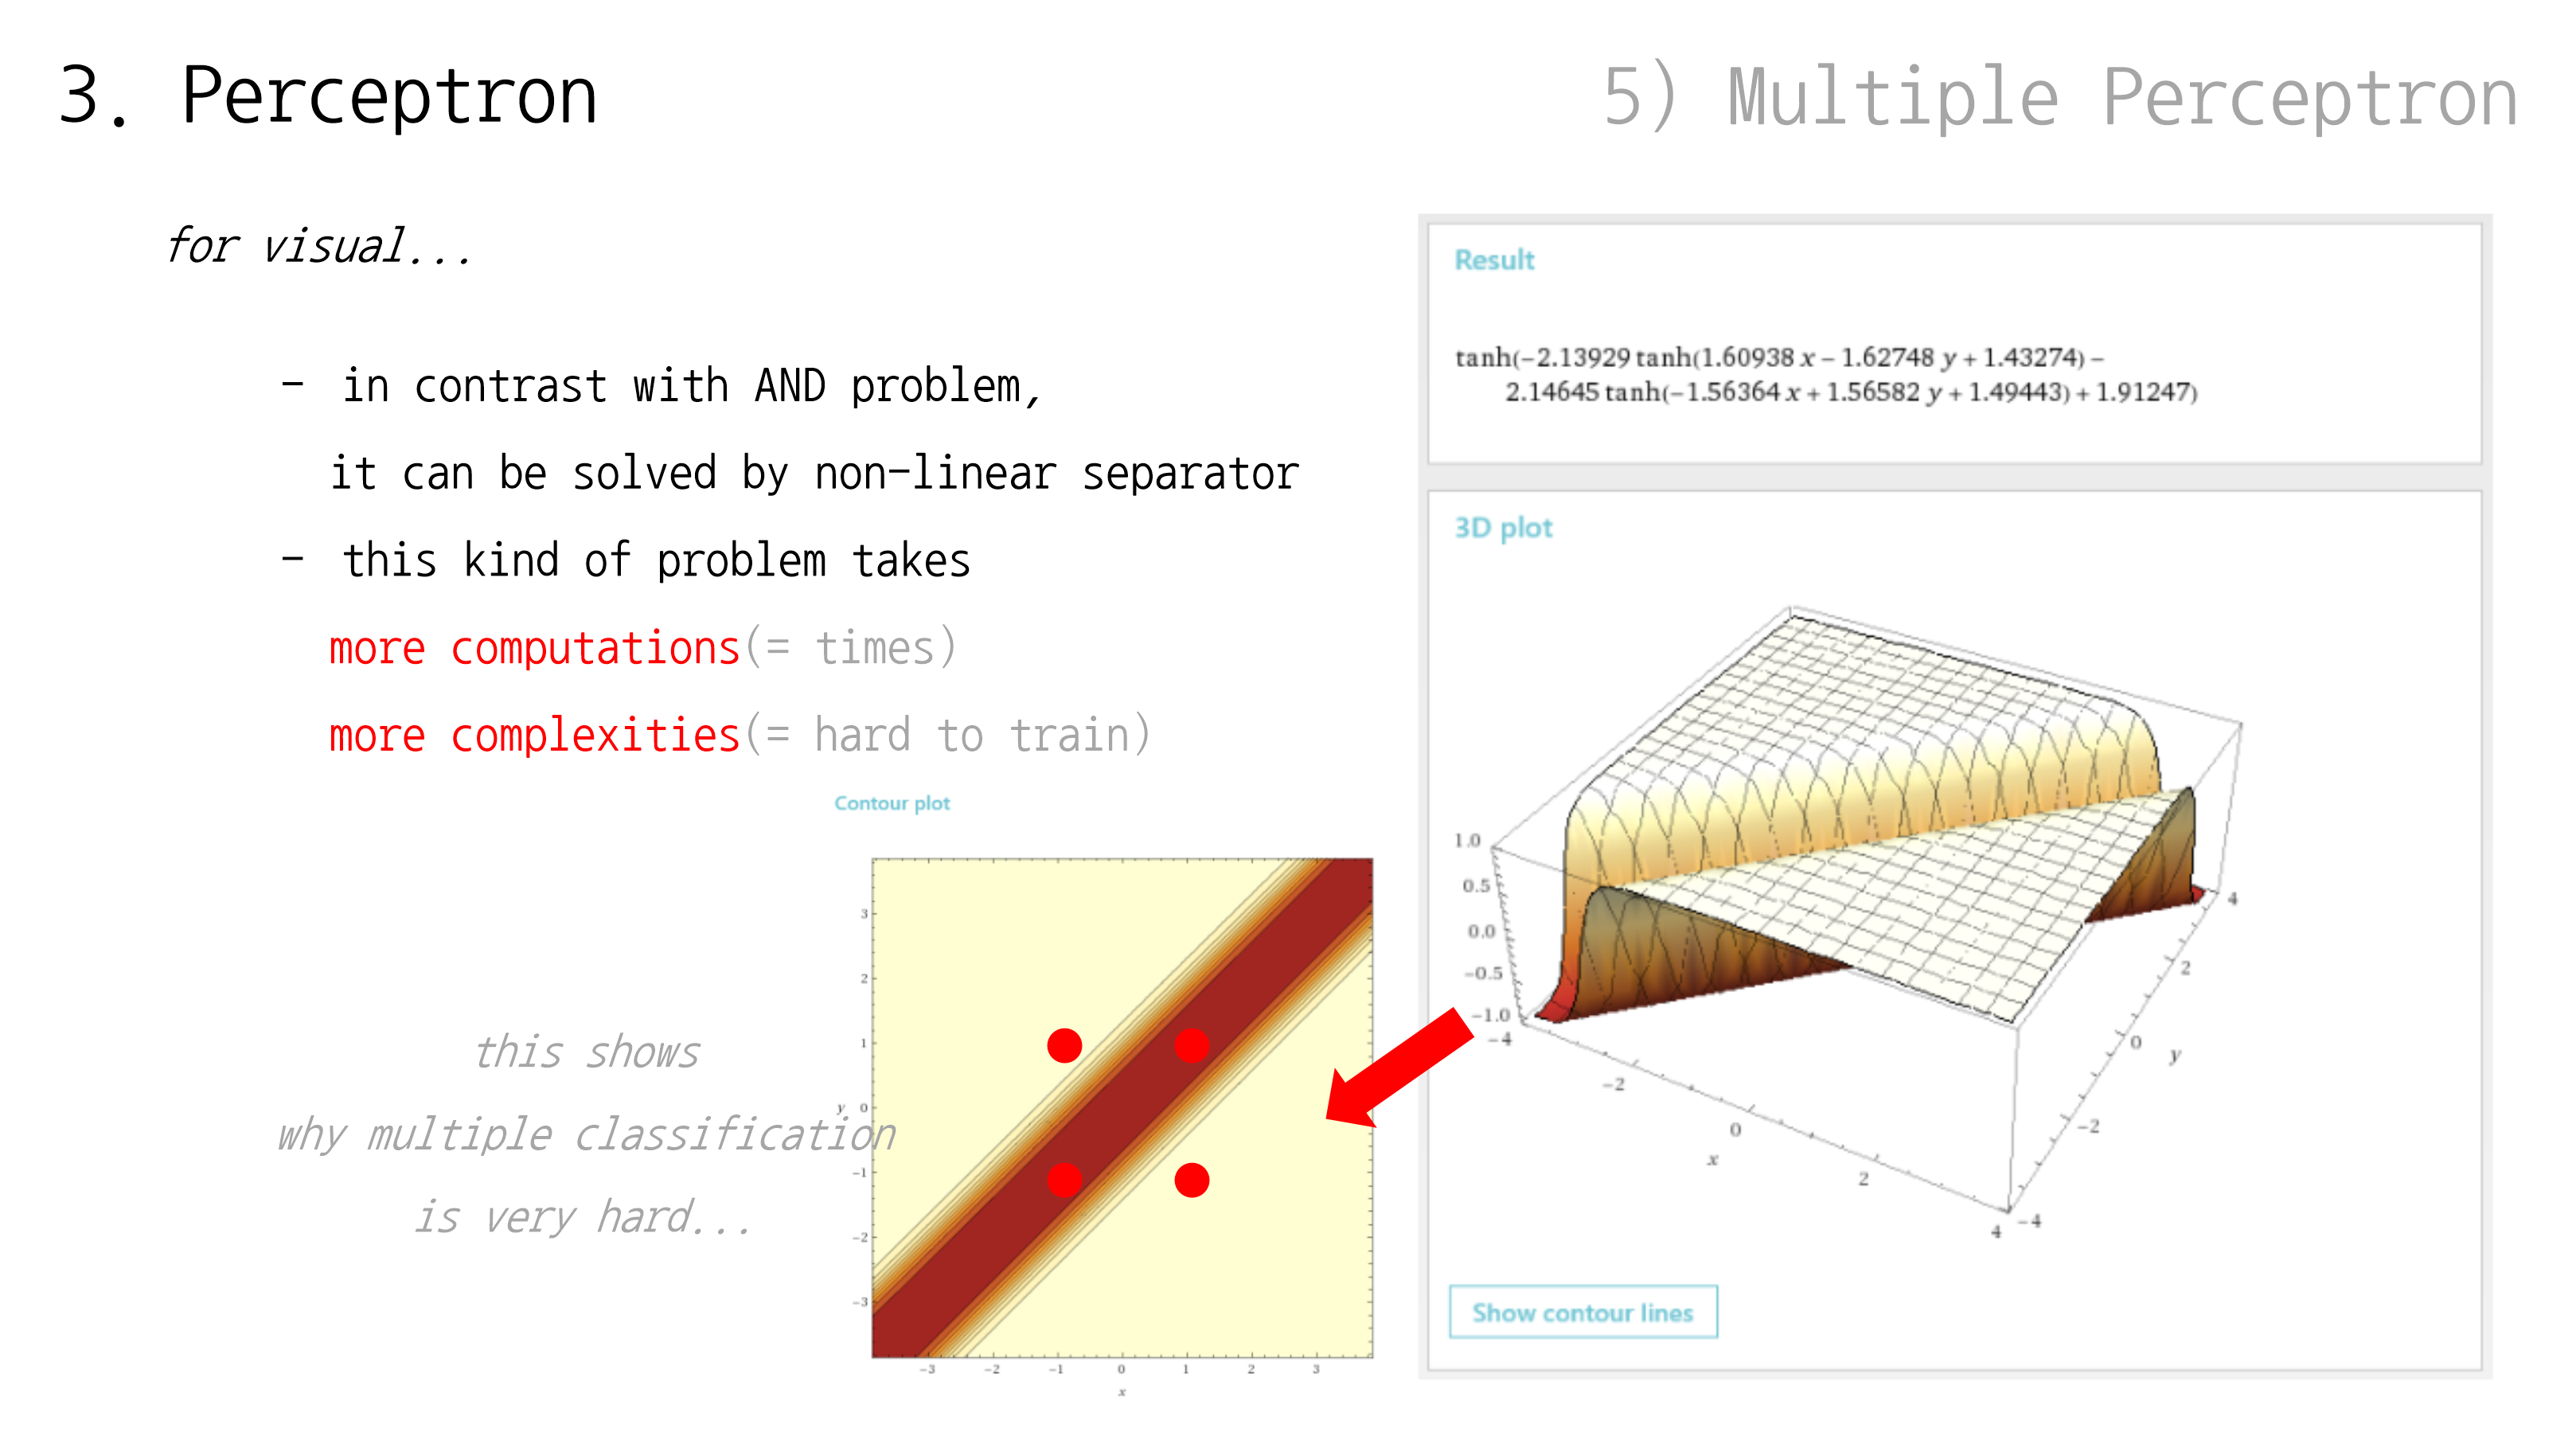
다시 말해, 단일 퍼셉트론만으로 2가지 초과 데이터를 분류 불가능
이것을 해결하기 위해, 다중 퍼셉트론을 추후 이야기할 것임
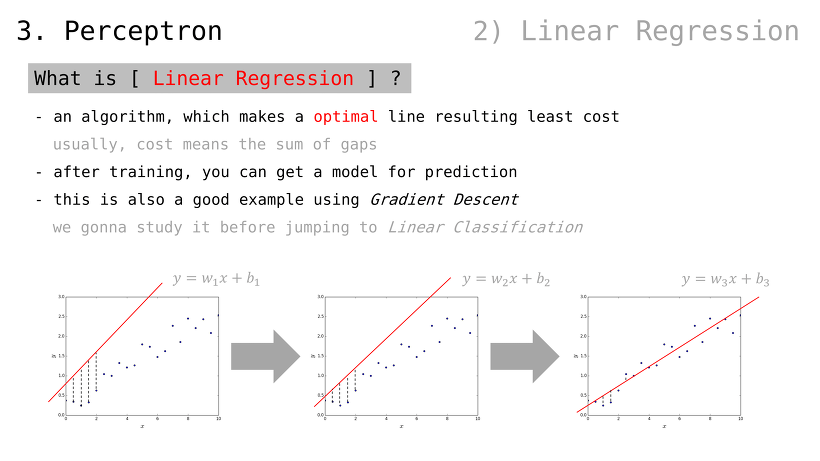
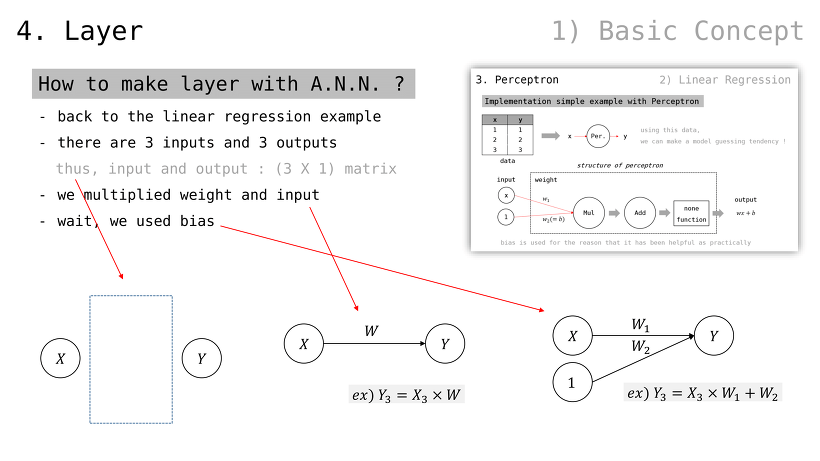
Linear Regression 이란
(데이터를 가로질러) 비용 최소화 선을 그릴 수 있는 알고리듬
여기에서의 비용이란, 오차들의 합산
예측 모델을 얻는 방법으로도 볼 수 있음
Gradient Descent 의 좋은 활용 예시이기도 함
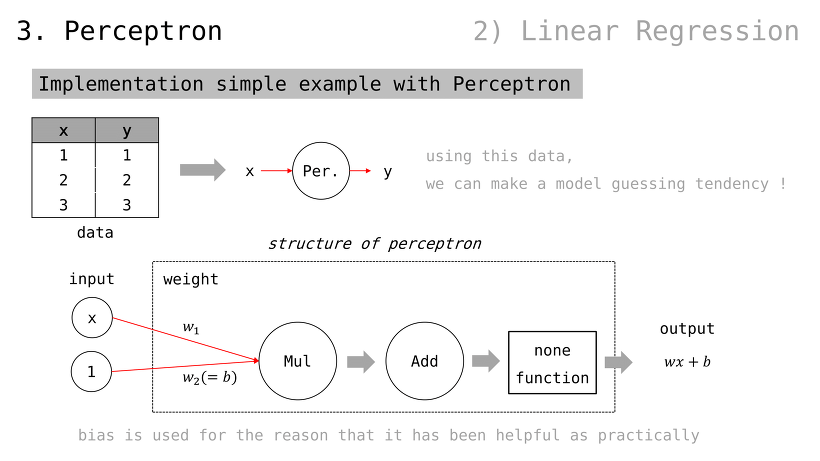
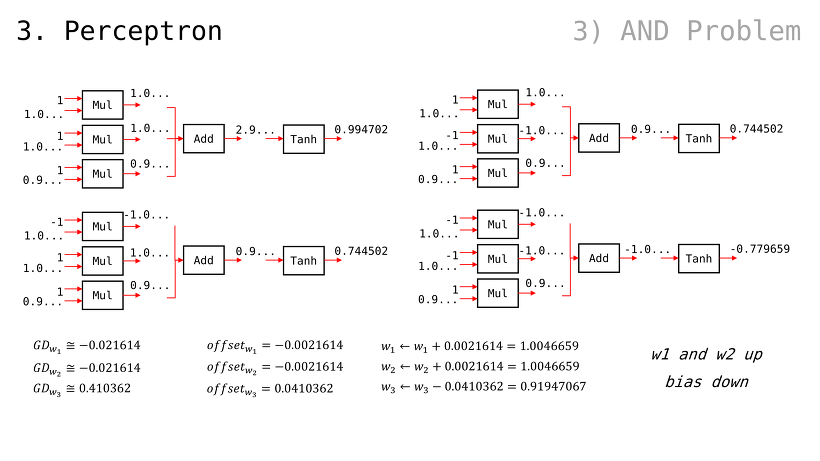
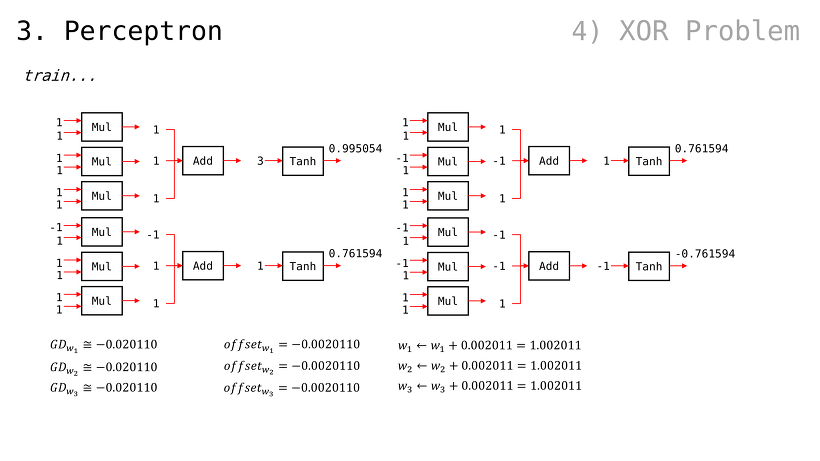
퍼셉트론으로 간단한 예제 구현
입출력값이 각각 1, 2, 3 으로 주어졌을 때 퍼셉트론이 이들을 제일 적은 비용으로 가로지를 수 있도록 학습시켜보자
참고로, bias 라고 하여 가중치를 하나 더 조절할 수 있는 placeholder 를 사용하곤 함 (경험/관습적으로 유용하기 때문)
즉, 다음과 같은 입출력값이 예상되고 각 출력값은 1, 2, 3 에 가까워져야함
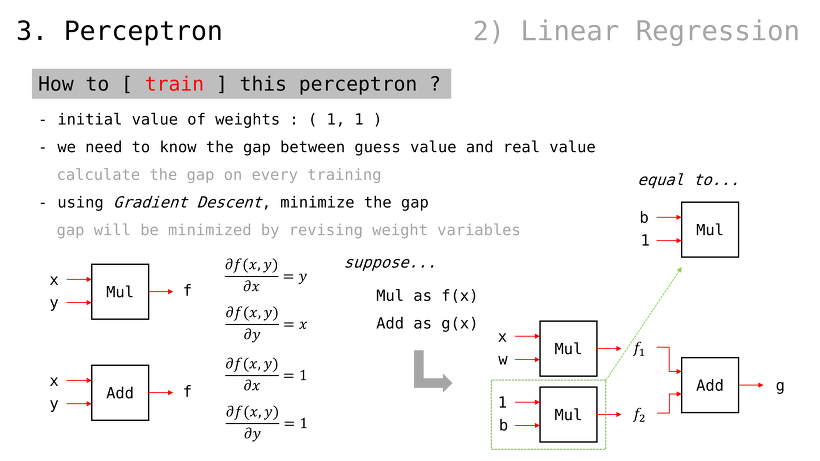
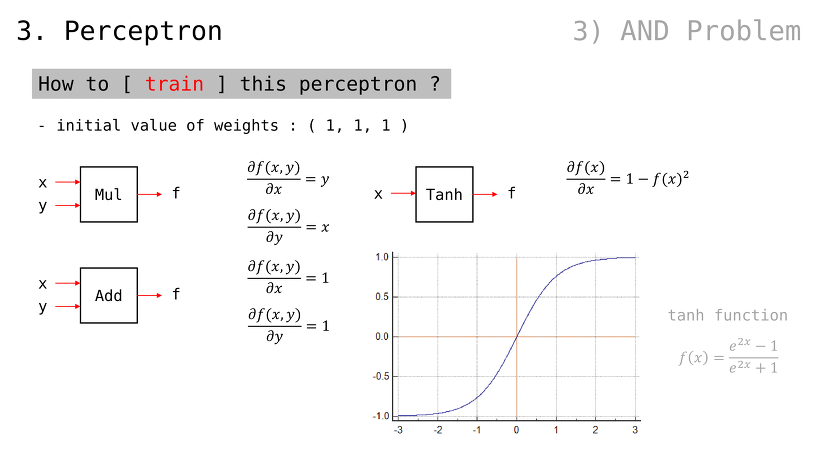
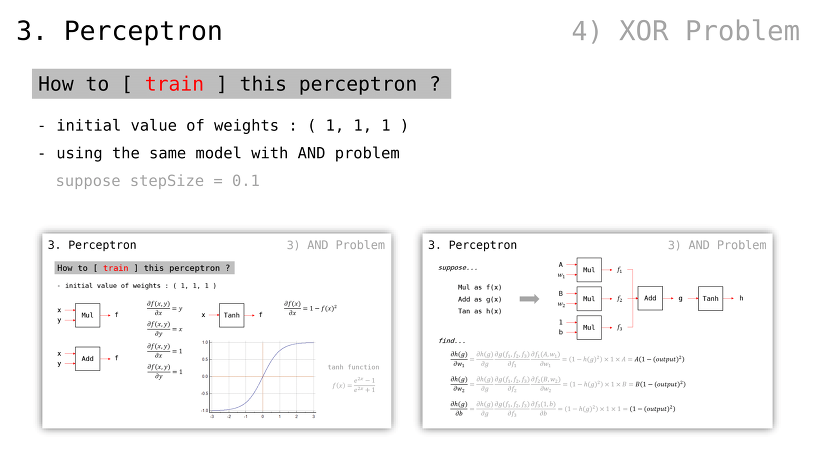
이 퍼셉트론을 어떻게 학습시키는가
모든 가중치 값들은 1 로 설정하자
매 계산마다 비용 값을 계산해야할 것
그리고 Gradient Descent 통해 그 비용을 줄여나갈 것
가중치 값을 변경함으로써 이를 실현할 것
어떻게 Gradient Descent 를 적용하나
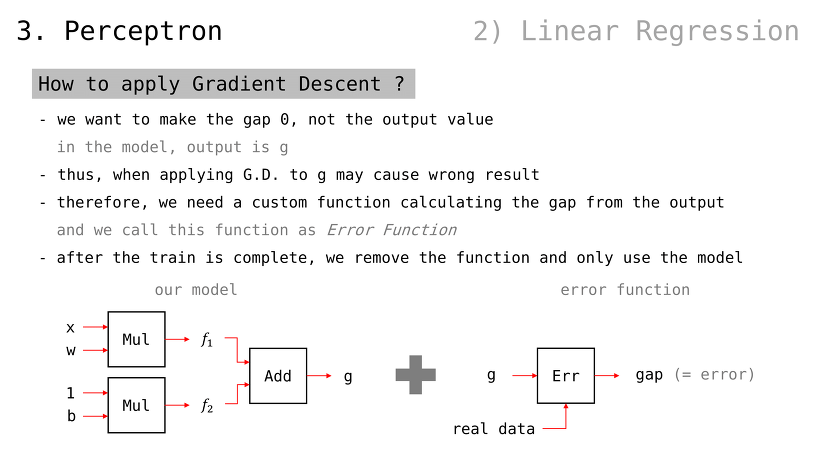
우리는 비용을 줄이고 싶은 것이지, 출력값 자체를 0 으로 만들고 싶은 게 아니다
따라서, 앞서 G.D. 예시들처럼 다룰 경우 결과값이 0 으로만 만들어지고 말 것
그러므로, 결과값으로부터 비용 계산하는 함수 만들 필요 있음
이를 Error Function 이라 부름
(Error Function 붙인 채로 학습을 진행하고,) 학습 완료 후 Error Function 을 제거한 뒤, 모델 그 자체만 사용하면 되는 방식
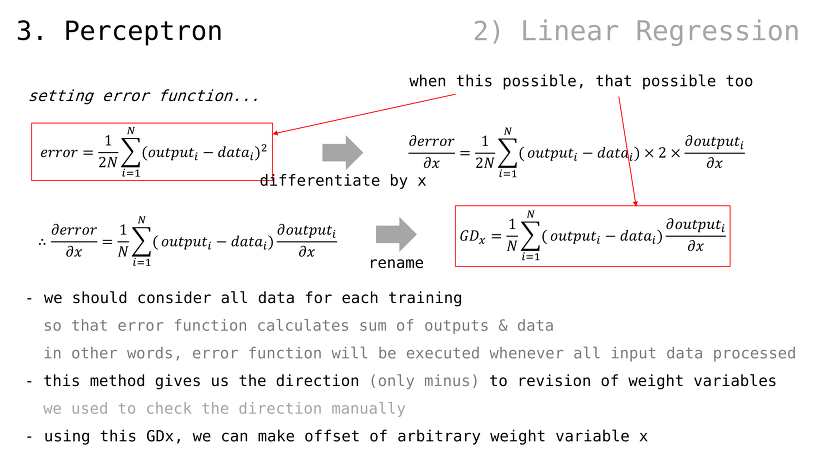
(확률과 통계에서의 분산 공식과 유사하며, 의미 또한 그와 동일함)
매 학습마다 모든 데이터를 사용해야함
Error Function 식 자체가 모든 데이터를 참조하기 때문 (sum from 1 to N)
다시 말해, Error Function 은 모든 데이터가 처리되고 나서 수행될 것임
(개별 데이터에 휘둘리지 않고,) 일관성 있게 가중치 변수를 조절할 수 있게 될 것
이전 예시에서는 우리가 직접 수행했던 부분임
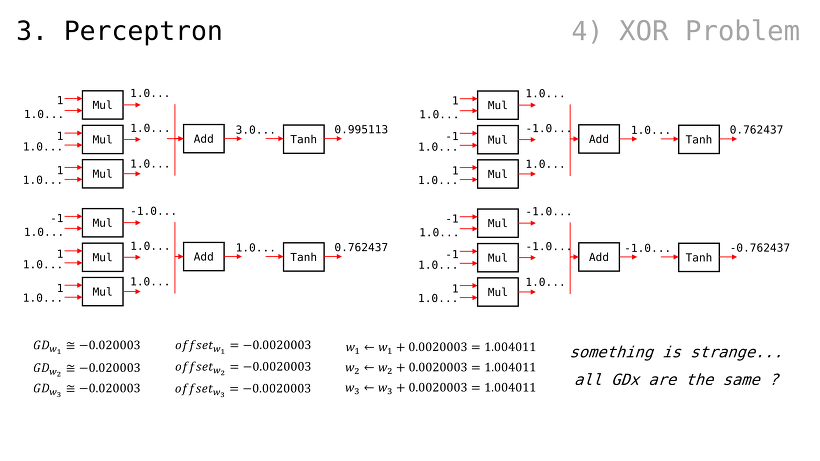
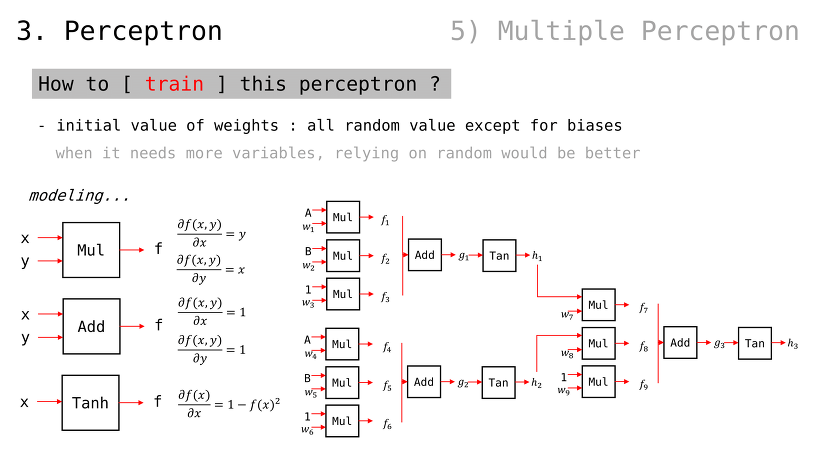
(편의상 Error Function 을 편미분한 값을 GDx 라고 하자) 이를 사용하면 역전파도 할 수 있으니, 가중치 변수 x 를 조정할 수 있을 것
(아래 내용은 GDx 구하는 과정)

가중치 수정 방향을 (+ 또는 -) 어떻게 결정하는가
지금까지 알아본 내용들 기반으로, G.D. 방법론으로 결과값을 0 에 가깝게 만들 수 있음
여기에 Error Function 을 추가하면, 우리가 원하는 값을 나오게 만들 수도 있을 것임
Error Function 을 거치는 과정에서, 제곱 연산 때문에 무조건 양수 값이 나올 것
따라서, 우리는 Error Function 값이 0 에 가까워지도록 줄이기만 (minus) 하면 됨. 어차피 음수 값이 나올 수 없기 때문
(사진은 제곱 함수의 특성 설명 예시일 뿐. 이번 예시의 Error Function 을 그래프로 그린 것이 아님)
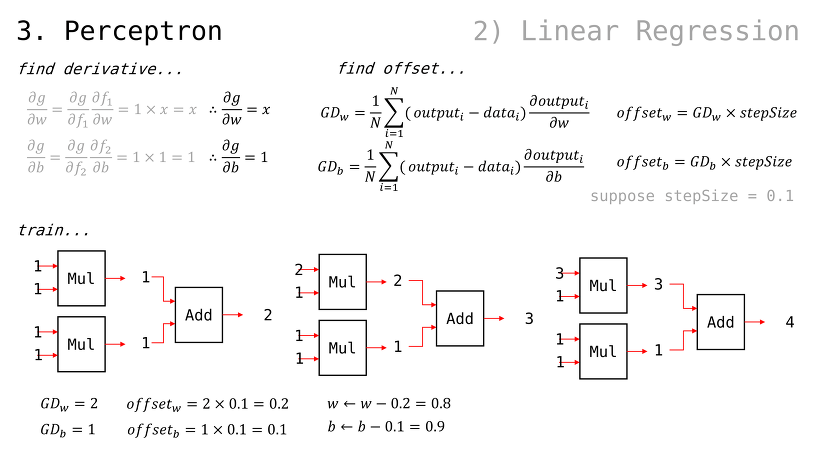
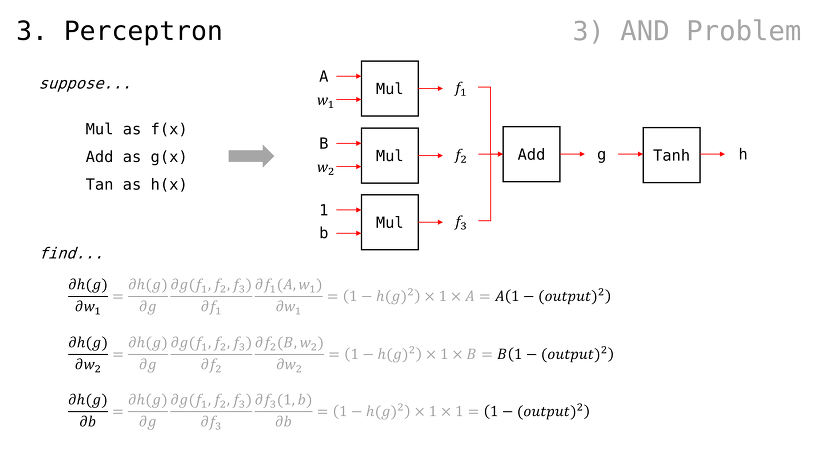
퍼셉트론의 출력값 g 에 대한, 가중치들의 편미분값은 앞서 봐왔던 방식대로 구할 수 있음
에서, 당연하게도 서로에게 곱해지는 값이 곧 편미분임(w 입장에서는 x, b 입장에서는 1)
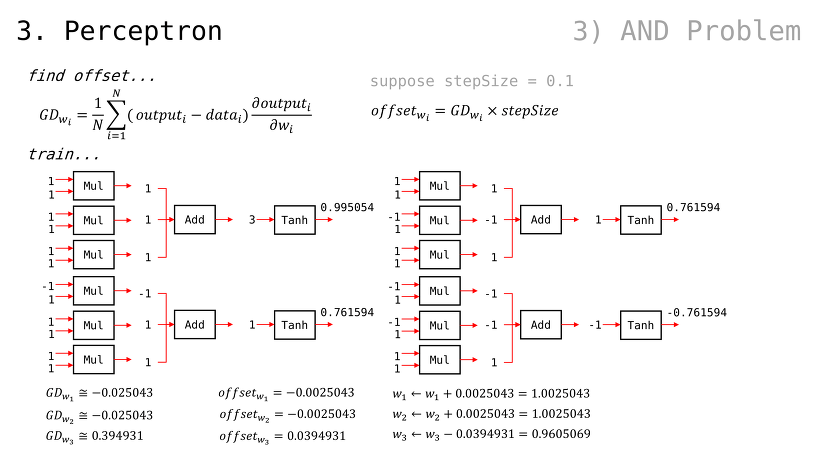
일 때, 이므로 GDw 및 GDb 는 다음과 같이 구해질 수 있음여기에서, 가중치 값들에 대해 GDw 및 GDb 를 step size 만큼 조정된 값으로 빼주기만 해도, 다음 번 Error Function 값이 떨어질 것임
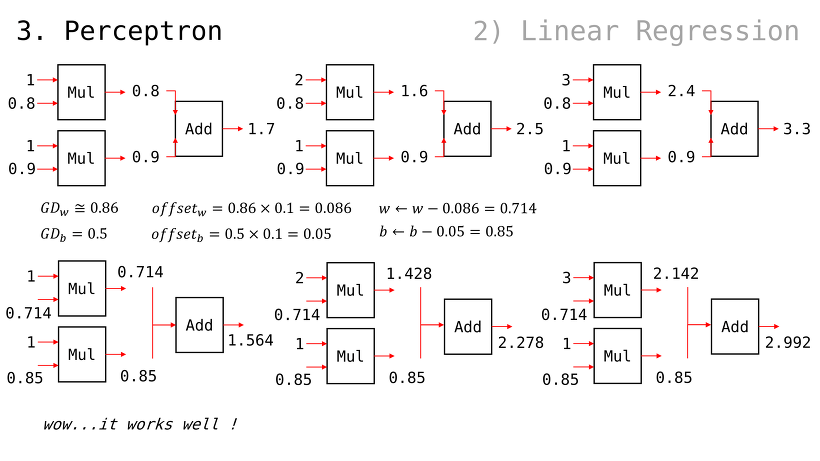
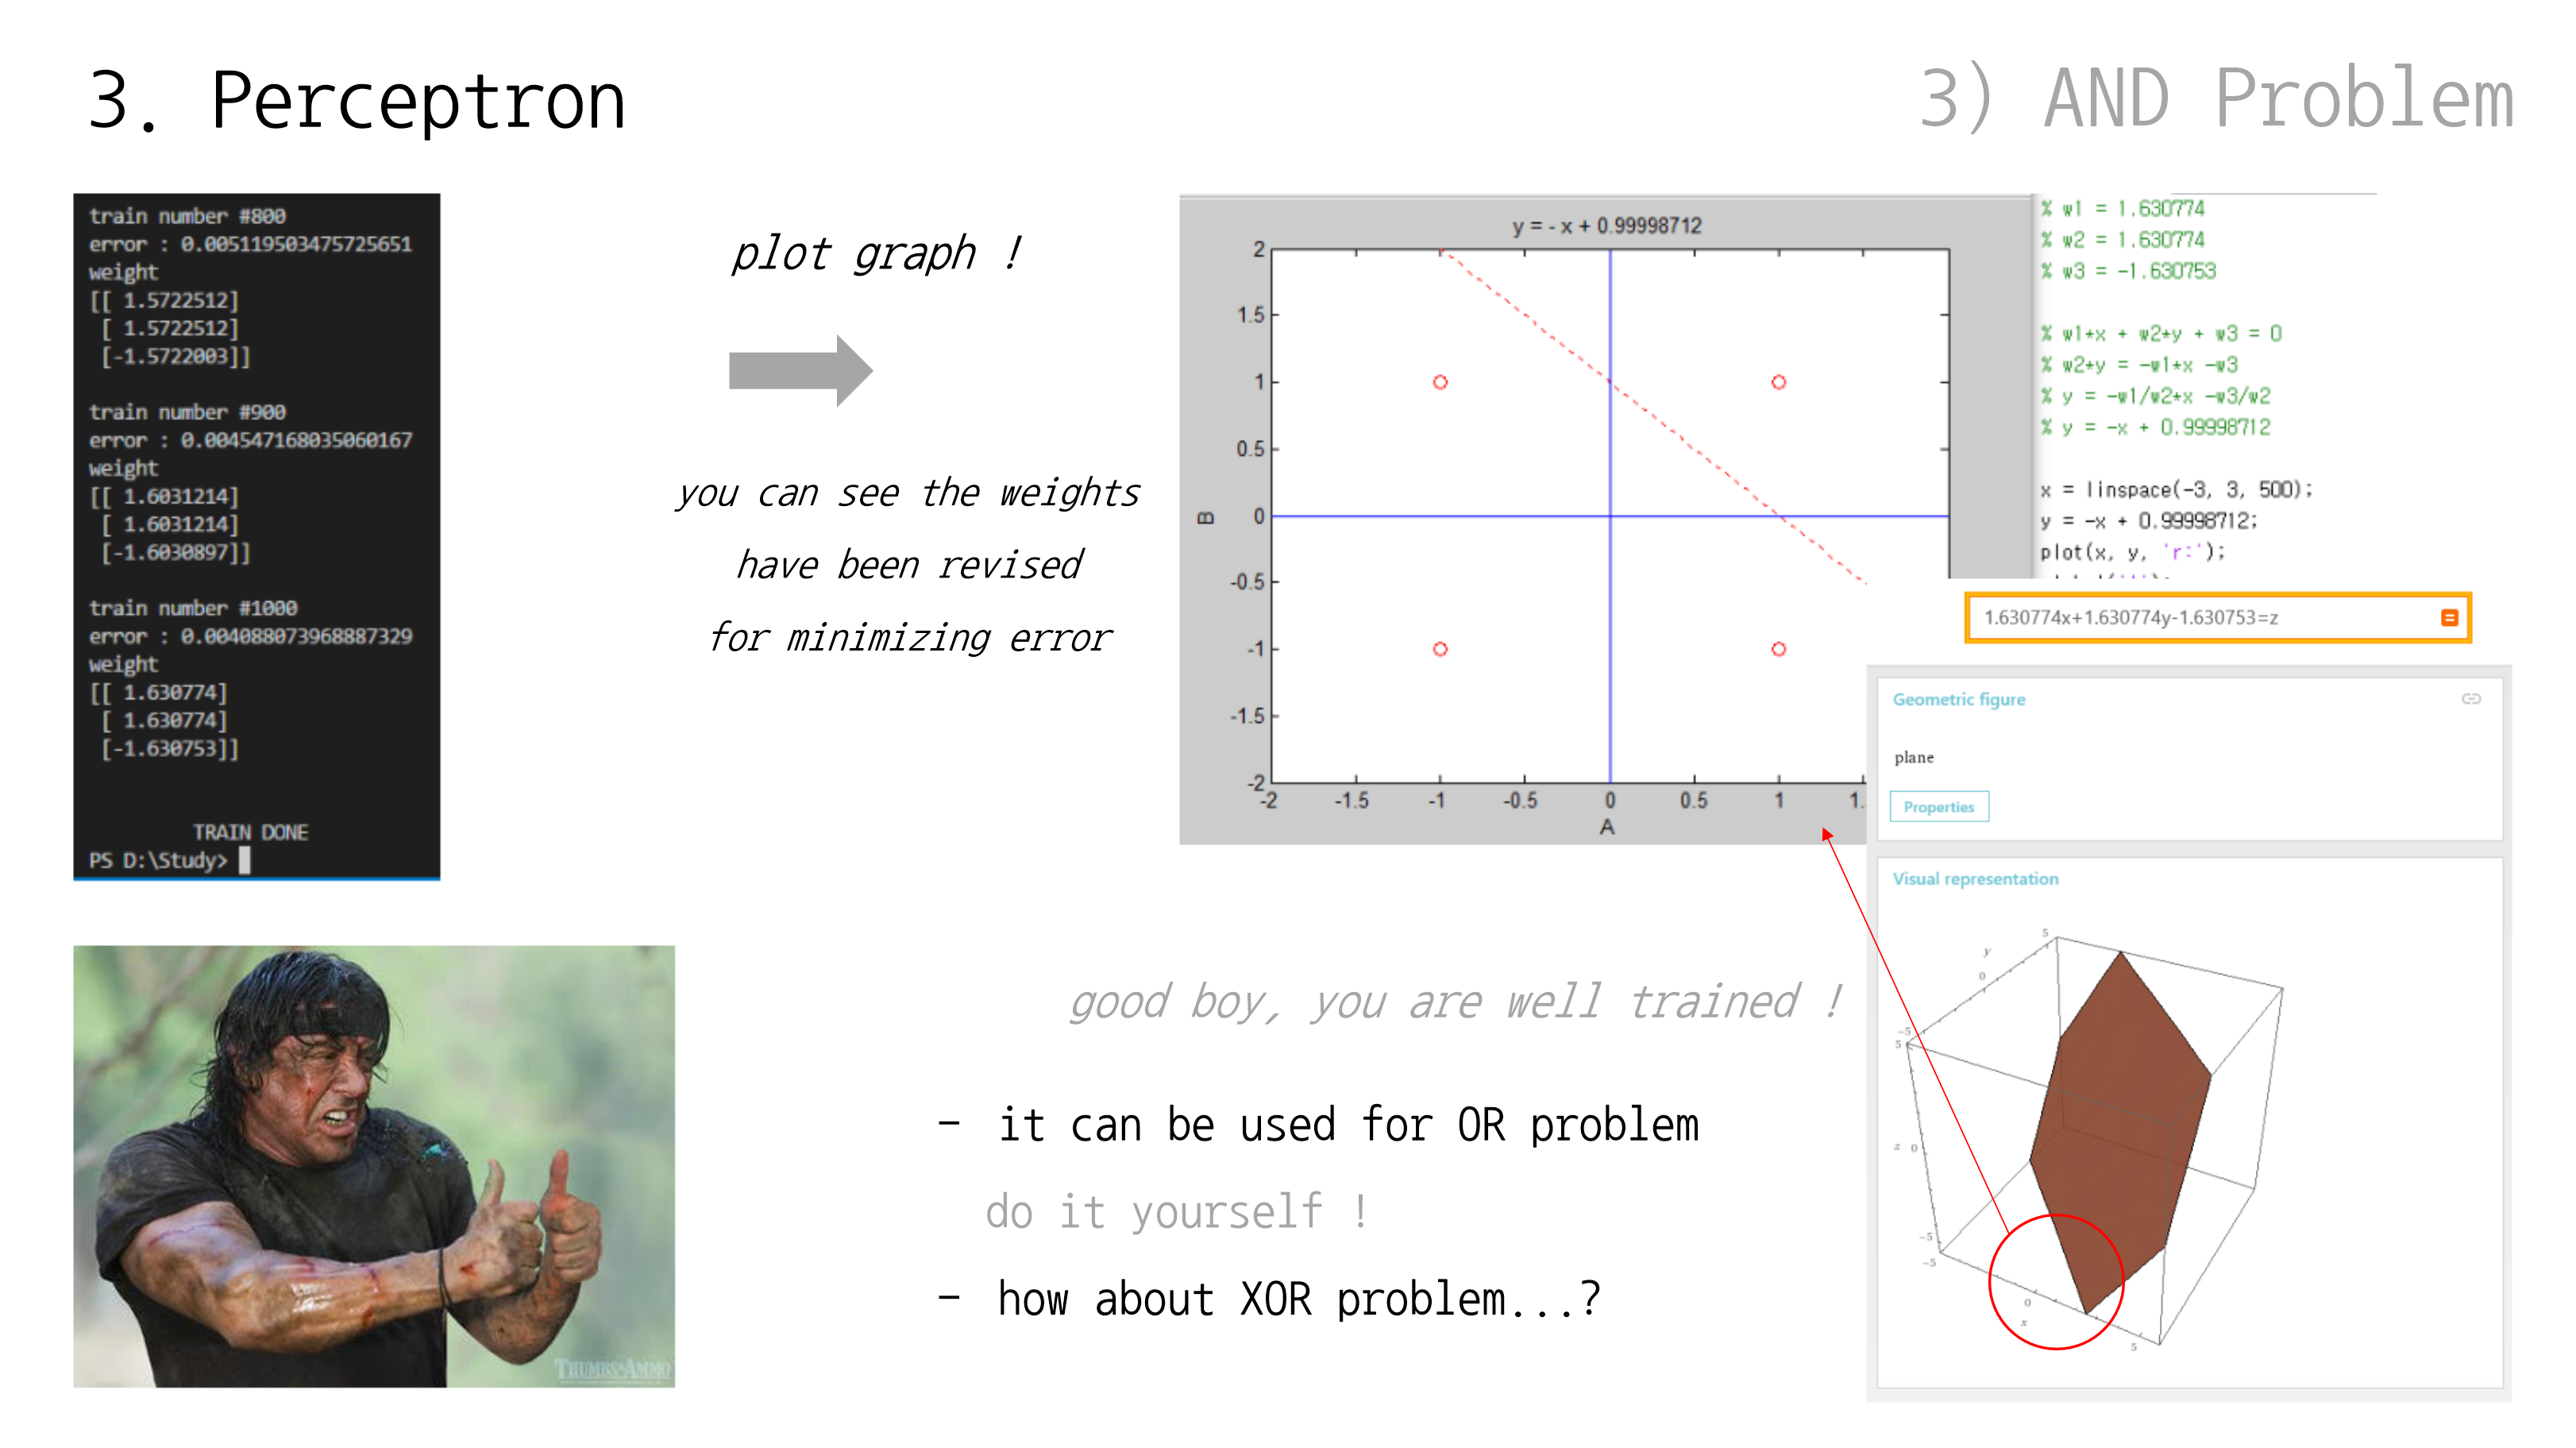
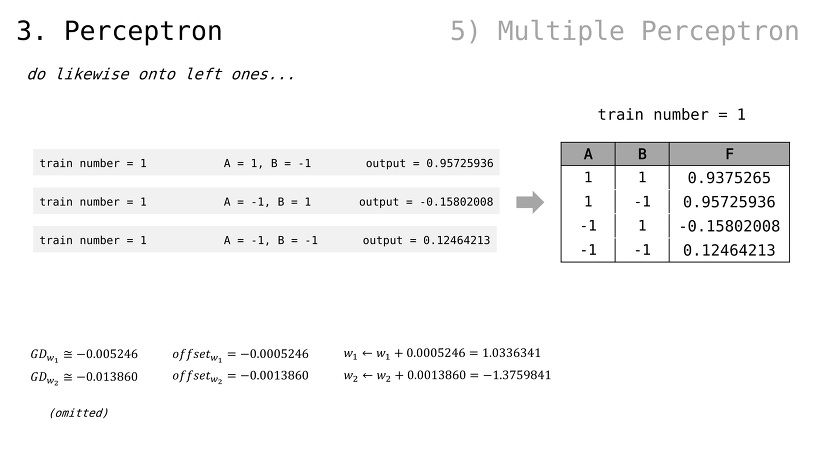
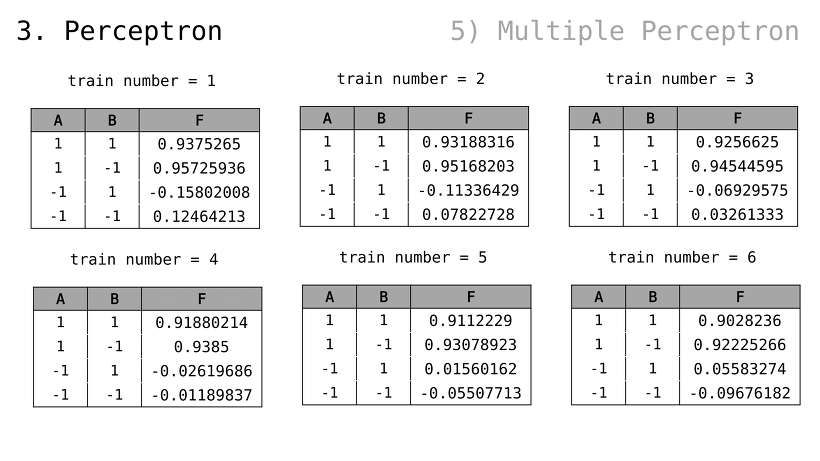
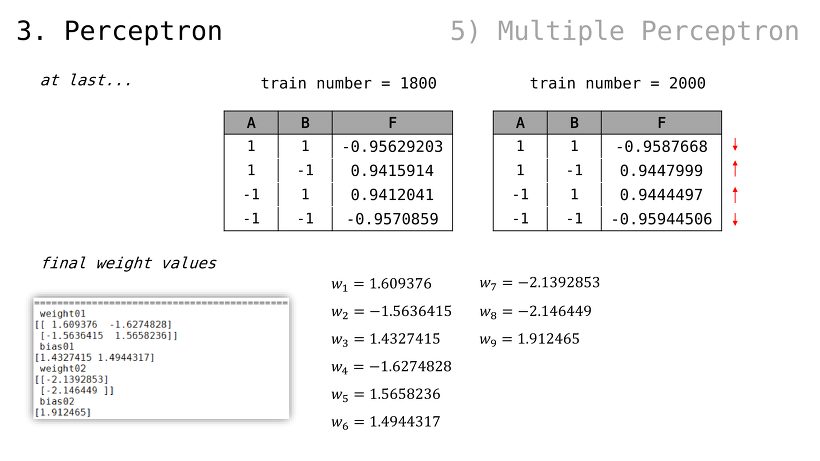
2번째 입력과 3번째 입력을 순서대로 확인해보자
g(x) 값이 점점 y = x 꼴에 맞춰가는 걸 알 수 있음
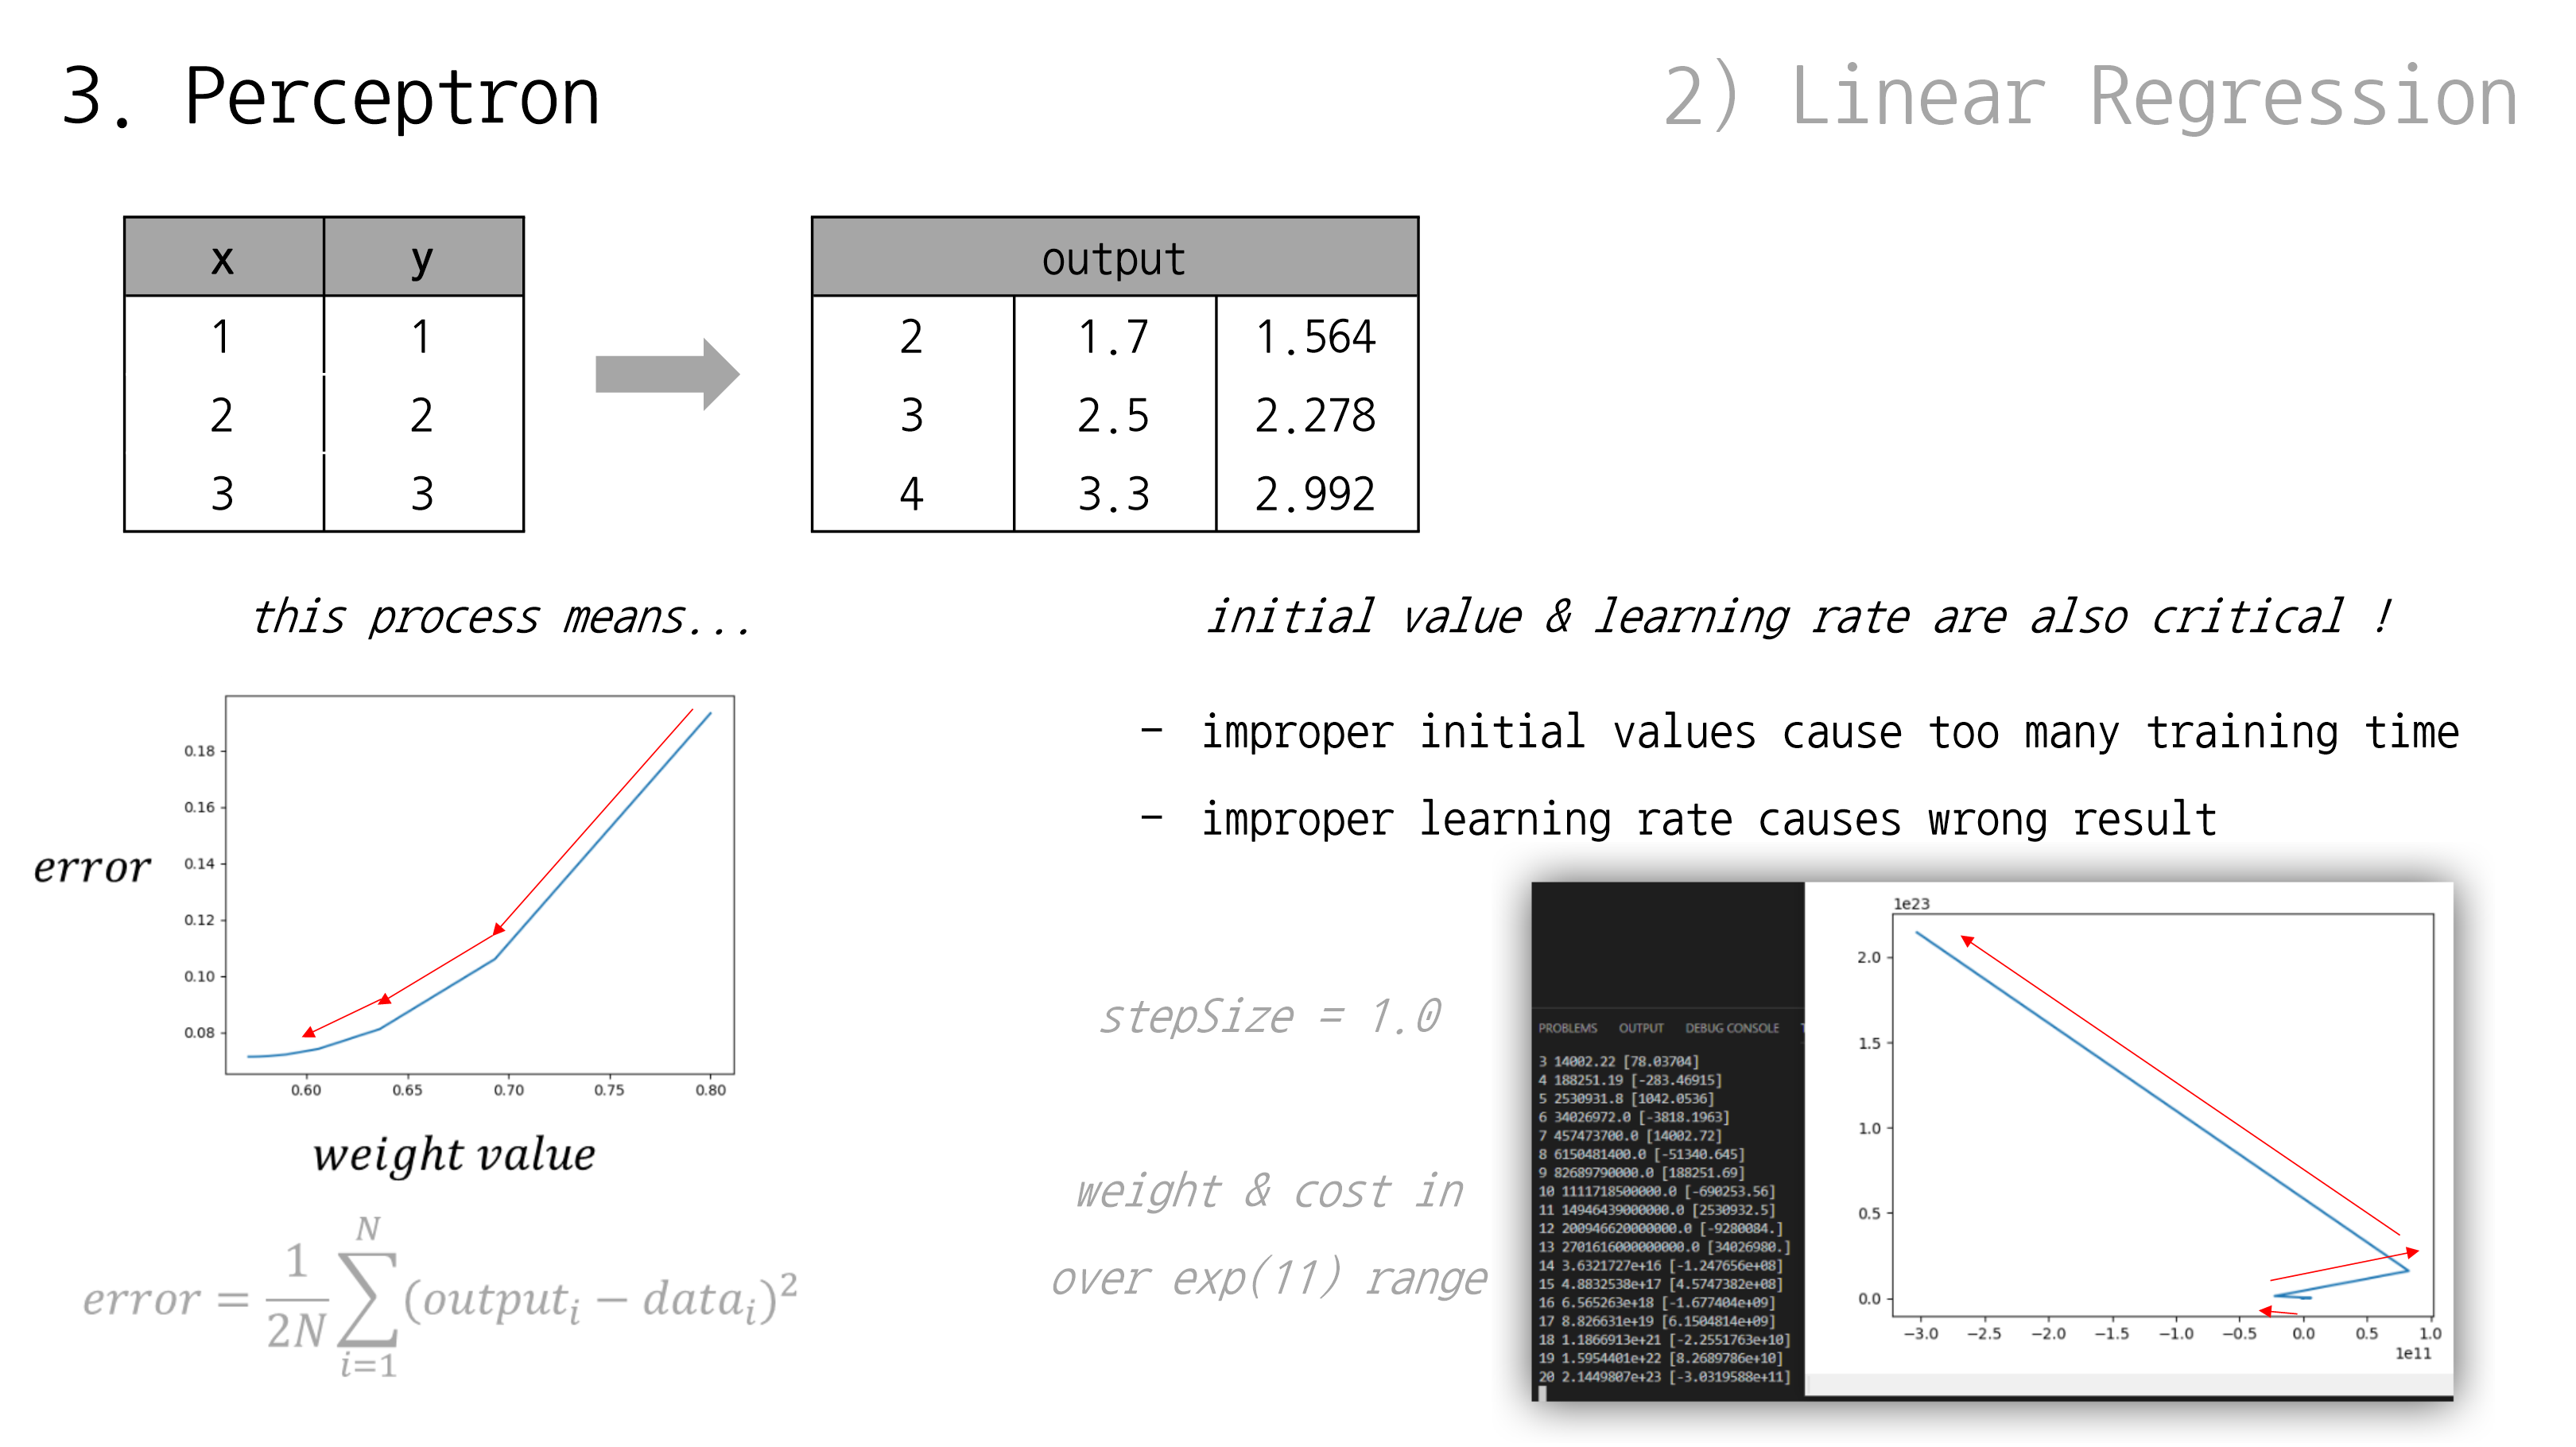
G.D. 같은 알고리듬이 잘 동작하는 예시를 살펴봤는데, 어디까지나 잘 준비된 예시일 뿐 실제로는 문제 발생하기 쉬운 것이 인공지능 학습임
우리가 살펴봤던 step size = 0.1 예시의 경우, 가중치 값이 조절되면서 비용(error) 수치도 줄어드는 걸 알 수 있었음
하지만 반대로 step size = 1 로 설정했을 경우, 비용 수치가 줄기는 커녕 늘어나는 현상을 볼 수 있음
( 같이 무지막지하게 큰 수까지 올라가버림)
따라서, 적절한 초기 가중치 값과 step size 수치 설정이 중요함. 이는 여러 차례 시도하며 경험해보는 게 일반적
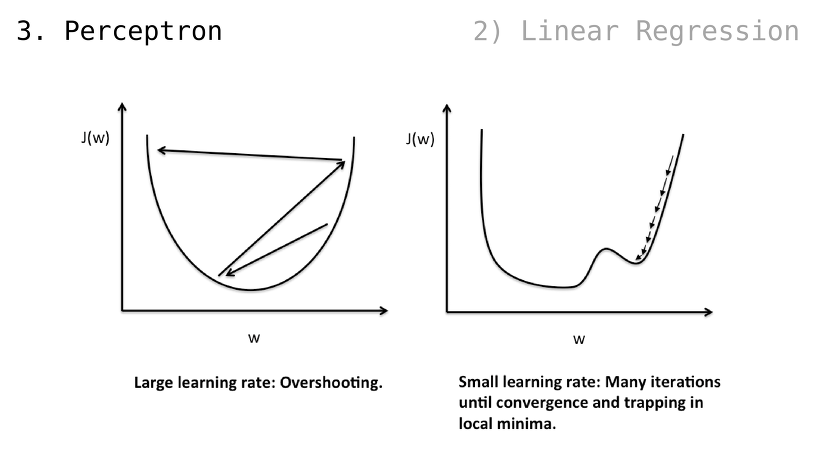
직전 슬라이드에서 보았던, 비용 수치가 오히려 증가하는 경우가 곧 Overshooting
하지만, step size 가 지나치게 작을 경우 국소적인 해 ㅡsolutionㅡ 에서 벗어나지 못할 수 있음
(국소적인 해에서 벗어나고자 가중치 값을 수정해보지만, 비용 수치가 증가하니 다시 되돌아가려는 동작을 해서 도루묵이 됨)